Ravenswing is up and running on lithium batteries. We came back the next morning and found all four “parallel 4 packs” had balanced out to 3.28volts. Anton caught my tired typo the whole the other night; the parallel wiring of four cells of course kept the voltage in each new 400 amp hour battery at the 3.5volt level. All 16 cells had been hand-leveled at 3.28volts about four months ago, so I was happy they had not changed at all while waiting for this week. So we then proceeded with wiring them in series, to get up to a 400amp hour, 12v battery. 


13.18v is pretty low, so we hooked up an old car battery charger rated at 10amps, which struggled to get the pack up to 13.31v after a couple hours. We’re ok leaving it there until the charging sources are hooked up.
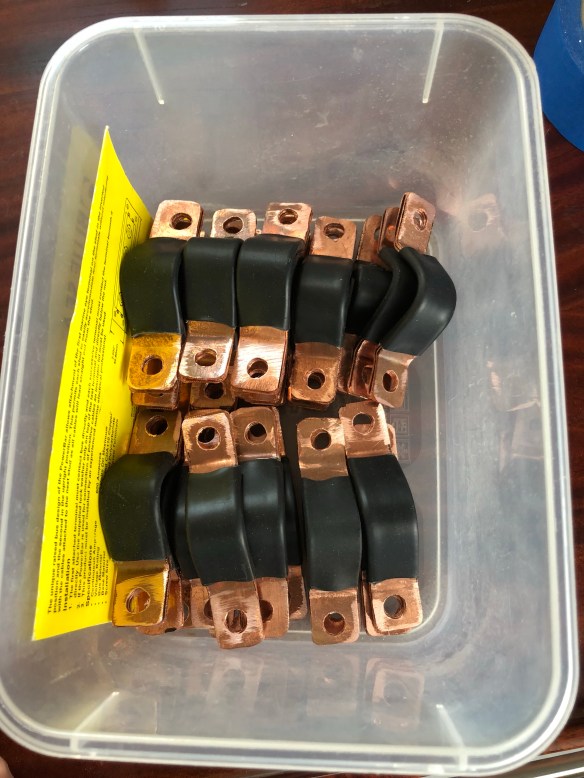
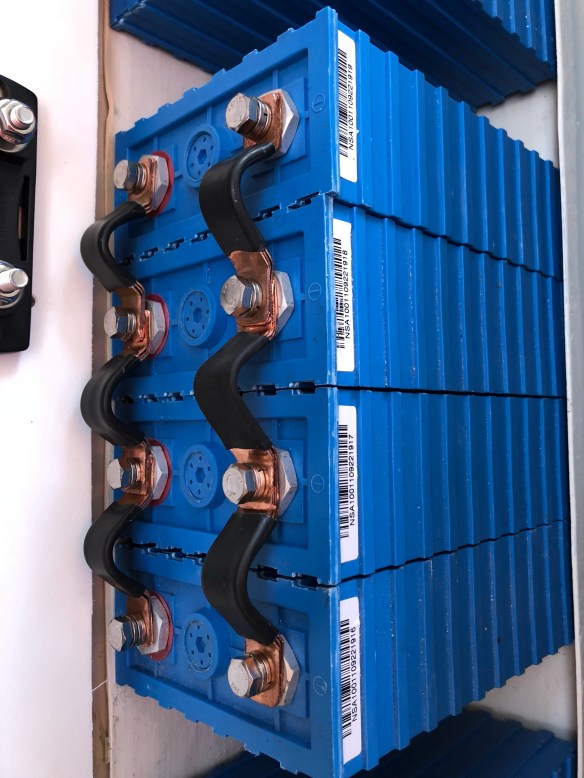
There are three serial ‘jumpers’ between the four 3.5v groups. Note the one in the middle goes through a 150amp fuse; this is the first line of defense safety for a bad short circuit situation. 
The previously installed 12v distribution panel matches the digital meter, and is a good at-a-glance basic tool. 
But JoeS, a Bay Area Multihull veteran ocean cruiser, wants more details! Here goes, Joe…
I’m thinking of a max charge limit of 14volts (Joe does 13.8).
Lower limit discharge voltage is still up for debate. I need to read up on my CALB cells again, and ask the supplier EV.tv for their reco.
We’re installing a CellMon to monitor the voltage of each 3.5v 4-cell grouping. I’m judging that our usage and our charge pattern will be non-stressful duty for this bank, and thus it’s not necessary to monitor all 16 cells individually. I haven’t decided about installing any battery temperature sensors.
The CellMon will signal out to a loudspeaker alarm when a high or low limit has hit. I believe a second signal can be created at another voltage value, which we can send to the battery protection cutoff to shut down the power immediately. That device is planned to be the Victron BP-100. It is Bluetooth enabled and gets programmed from a phone / iPad app.
Primary battery monitoring is a Victron BMV712. This is also Bluetooth driven by an app. We mounted it at the nav / comms desk but it isn’t wired to the battery yet. Pretty sure it handles battery temp, if so we’ll get that sensor.
All three charging sources will be brought in to a common bus setup, then routed to a smaller Victron battery protector – BP65. This will be set with a lower limit than the BP100’s master cutoff, so all charging sources will be cut off from the battery before the battery gets “too full”.
The one decision not made yet is how to control the four 100watt solar panels. I’m leaning towards four separate circuits, each using a Genasun 140 Lithium profile MPPT controller. This will be the best at dealing with shade management (because the panels are in four different places around the boat). The alternative is bringing all four solar panels into a Victron MPPT controller (150/30 model I think). I like the idea of all-Victron because their stuff works well together. But does anyone know if the single controller can do differing shade per panel management well? Arlene and Glen, have you dealt with this?
Joe, the BMV712 is lithium-programmable. You tell it your ‘tank is full’ setting (e.g. 13.8v) and it does all the math from there, providing % of capacity left, and all kinds of other info. I’m excited to have it on the boat’s iPad.
All of this battery management stuff won’t happen until after the mast build journey, so we’ll stop talking batteries for now.
Early today we motored from Richmond to San Rafael Yacht Harbor. It’s not talked about much, but perfect for us with a big crane and it’s a DIY-only yard. You can’t hire them to work on your boat, but there are contractors swarming the place. And some funky toothless guys. (And gals). The yard crew is very competent with 30-45′ boats. 


They swung the boat just a few feet above some late model cars – yikes!
Farrier’s design does look pretty swanky once you can get a few steps back. I love this angle…
Labor Day Yard day 1 was all about the dagger trunk. It was much more involved than I planned, as I realized hull-builder Howard had wrapped the Kevlar keel-line protection up into the trunk about three inches, and that buildup at the very bottom of the trunk was really screwing up the dagger fit. It was arm and back burning work to reach up past the foil block and rasp & shurform & grind as needed. I also had to rip out all the shims I installed during last November’s haul out. Argh for me, and at one point I wanted to punch Howard in the face. But by 7pm tonight the board goes up and down, fits snugly and the exit slot is re-epoxied. Keen followers will remember a few months back I sliced off 1.5″ from the aft edge of the board. Next time we’ll talk about the crash bumper that’s replacing that cutout. Stay tuned.