The Leneman Steps

Yes, that sounds like a special passageway in old Europe. But back here in California our boat’s boarding ladder gives it’s credit to good friend Mike Leneman and his lovely Minette catamaran. After a brisk Wednesday night sail out of Marina Del Rey, Mike simply stated, “yea Greg, you’ll be making one of these”.

20131128-000747.jpg

These steps will swing up and tie off to the beam brace when not in use, and the whole unit will quickly unpin for storage in the float when at sea. The bottom step is one inch above the waterline when the steps are set at level. They can raise or lower to suit conditions.

Sailing aboard Minette last year was a real inspiration for this project. Mike built her with the same cold molding strip plank and glass method, making a strong, light boat out of trailer able large hulls, beams and bridge. Her simple systems and big powerful rotating rig scared Jim and I at first, but the speed and sea keeping abilities really grow on you quickly. It’ll be a thrill to join Mike down south next year.

20131128-001155.jpg

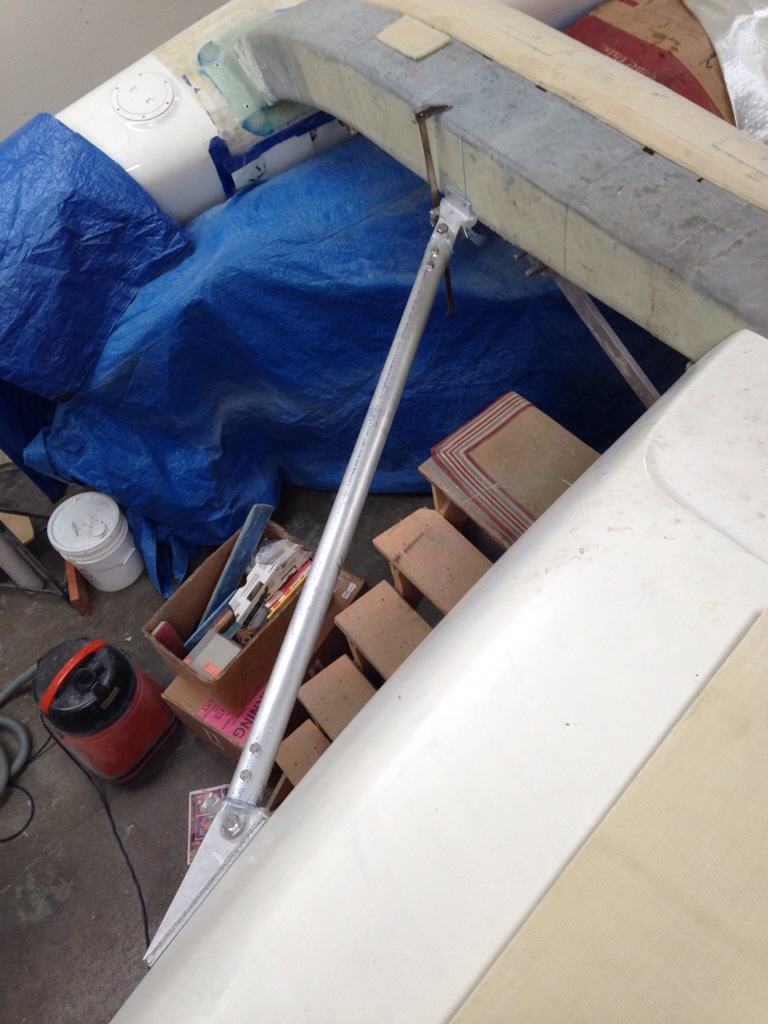
Here’s a clearer shot of the rear diagonal brace behind the aft beam. Very sturdy and designed to keep the whole boat square (prevent wracking that can occur in weaker trimaran designs). Thanks again Dad for cutting all the thick metal tangs that I cemented in to this pole. The epoxy goes in 4 inches, stopped by foam plugs at each end. There will be netting placed in this triangle later on.

No shop work yesterday as the decks (and minds) were cleared for Jeanne and Greg to enjoy our 25th wedding anniversary day. Sunset on the Pacific was perfect.

20131128-002504.jpg

Port beam fairings

While the actual crossbeams are complex, 100+ pound structures, they make up only 10 inches (looking down on them) across what will be finished 2 ft wide beams. The rest of the width comes a 5 pound ‘fairing’ made of foam core with one layer of glass inside and out. I showed them being built in their frames early this year. Here’s one of them with the access holes cut – that’s how we reach inside to glass them to the solid structure. Now that they’re installed, those holes will get filled back in this weekend.

20131114-232703.jpg

The silver and white panel in the background is the final panel of the refrigerator cabinet, the side where the cold plate mounts.

20131114-232846.jpg

After the fairings go on, the completed beams get flanges formed. This is where bolts will go to hold the beam to the float. In the photo you might be able to see the plastic non-stick that’s on the float deck. The Fiberglas flanges are formed in place, adhered to the beam but will pop right off the deck when we lower the float back to the floor.

20131114-233343.jpg

Today’s steps were the final primary construction of the four beams. That build spanned almost two years, so it’s a very satisfying milestone. There are plenty of hours left to skin and fair them, and add the net lashing points, but it’s a huge relief knowing the ‘danger parts’ work is done and the whole boat fits together as intended :)

Take Out

The port side beams are being fitted in to the float now. Since all the steps are being repeated from the other side, things are going much faster. One example is cutting the glass fabric and applying the epoxy out on the work table. Once all the pieces are wetted out, they get tucked in to the plastic wrap for transport inside the float. Kind of like a nicely prepared take out meal, ready for the picnic.

20131110-185546.jpg

Yesterday’s work was installing the cross-float webs (shelves) on each side of the bulkheads that bisect the float sleeves. All of this structure gives the beam-to-float connection a lot all-direction support. You can see the beam’ end bolt exiting the sleeve, and the big nut that snugs it all together.

20131110-190019.jpg

I ended the weekend by unpacking the new refrigerator unit and test fitting the cold plate in the fridge box. It’s all coming together nicely, and the low energy draw of the CoolBlue system, plus thick walls, should keep the power draw down in the range for solar-only management.

Now it’s on to installing the port side beam fairings. More pics in a few days.