Note to self

Quick update here for builders to confirm the technique of taping down the peel ply and applying epoxy in the marker lines worked really well. The table side of these panels came out smooth as glass.

20150327-193736.jpg
The galley countertop got some good news – the sheet metal neighbor is going to make a full stainless steel cladding to cover the whole thing. Good idea Jeanne! A very light, very durable solution.

20150327-193959.jpg

Today’s lamination table finishes the shelves of various cabinets, and the long piece is a valence / light box over the dinette.

Actually had to hunt around for tasks to fill the table – that is a great sign, ie we’re almost done with primary parts fabrication!
Thanks for noticing, Dallas :)

20150327-194319.jpg

Outside In

Well, that exterior build punch list is down to just a few things like a pulpit on the bow and a wood plate under the mast base. Short enough to move on to the cabins, and finish up outside in between other projects. Here’s how the past week went down…

The boom is done and ready for paint. This was a really satisfying project, remaking this spar from Transit of Venus’ original mast.
The control lines for three reefs plus the outhaul live inside the boom.

20150326-214155.jpg

20150326-214243.jpg
The hole on the end of that last photo will hold a spectra loop to catch the topping lift. Three reefs around the sheaves in back, with the outhaul just ahead. Here’s the boom end with line guides inside, before capping the end permanently.

20150326-214629.jpg

20150326-214646.jpg
And despite Charlie’s reluctance to cut holes in a friend’s boat, I got him to make these nifty exit holes after we tried out a few design options. (Got a little inspiration from a GM Futureliner restoration show)

20150326-215126.jpg
Next up was replacing a hatch on the port float bow (that unfortunately went missing when we moved the hulls 3 years ago). We took the inspection port off the starboard one and used it as a mold to get the curve right.

20150326-215537.jpg

20150326-215553.jpg
This will now sit idle until a new 10″ port shows up to match the existing one.

20150326-215752.jpg
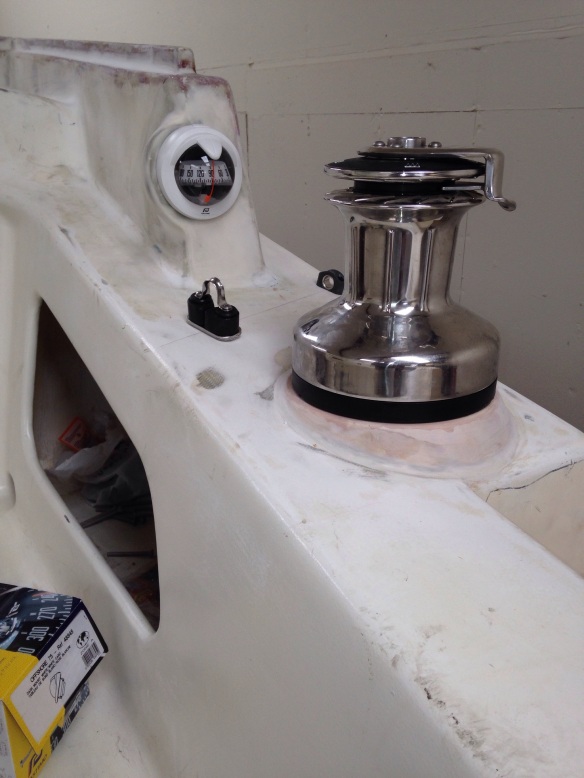
And up in the cockpit, we finished up more details. All six winches are now mounted; this mid-cockpit pair will handle the reacher and spinnaker sheets. The barber hauler controls are just ahead of the winch, and check out the new little pods for the compasses – there’s a duplicate of this over on the port side. Seems like a good spot, up and out of the way of seated crew / guests, and right in the sight lines of the driver from either down in the cockpit or out on the beams and/or nets.
20150326-220552.jpg
Speaking of the nets – they’re here! Recall last fall we saw F22 Dart’s at the first launch, and we followed up in purchasing 30lbs of Dyneema mesh. Yes, these are fishing supply people that sell it by the pound. This same stuff was on the America’s Cup boats last year, and doing it this way is costing about 1/3 or ordering complete trampolines from known suppliers in FL, etc.

20150326-221026.jpg

20150326-221047.jpg

Work this week in the main cabin shows progress quickly because each task is smaller. We’ve figured out a BlueSea 12volt electric distribution system, and the complete panel will live here above the radios and chart table.

20150326-221344.jpg

The galley is figured out now. The propane stove/oven unit got it’s mounting built (but installed photo forgotten). The metal trim of the unit fits right over the raised wooden rails and trims out nicely.

20150326-221701.jpg
Then looking to the left, we get a big, deep sink – after all, this is a second home, right Dad? The circle left of the sink is a garbage can built in to the countertop, so Jimbo can say it’s a real boat. And the freezer unit is at your far left in the photo.

20150326-222022.jpg
In the sink there’s a very deep strainer basket – that’s important to catch any food scraps as the drain water is set up for a grey water catch tank which will supply the toilet flushing. When we have a few gallons of “grey” stored up, the sink will be switched to drain overboard, via reachable levers in the cabinet. More on that later.

20150326-222431.jpg

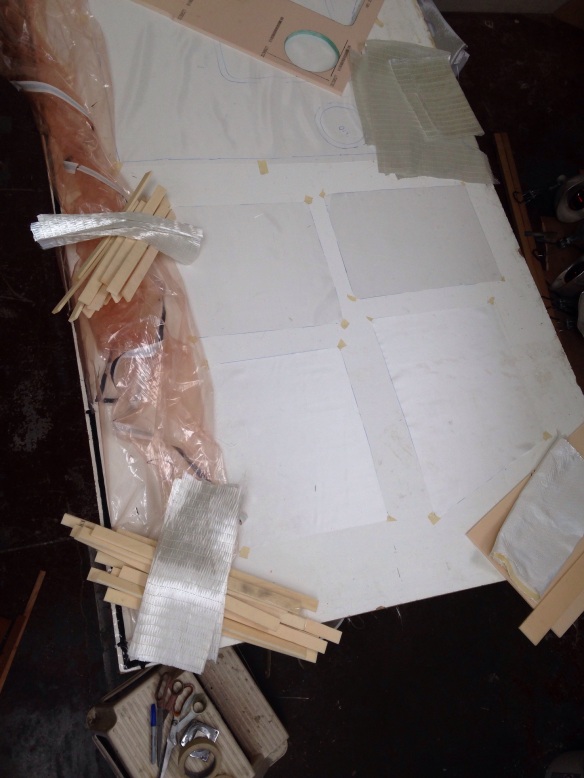
I noted in F39 Henny’s and F33 Arno’s blogs recently each spoke of it taking about three hours to get vacuum’d panels all set up and working. That’s my number too. This morning was about 3 1/4 hours getting all the fabrics cut, bagging supplies ready and prepping the after lunch lamination session. Last week we let a wetted sheet slip inside the bag for that float hatch and developed a wrinkle in the piece (that had to be ground away and patched). Got me thinking that we really shouldn’t move a piece at all during the wet out process. So today we tried marking the first-to-table peel ply with the exact foam core locations then taping the peel ply taught at the corners. This worked well.
20150326-223840.jpg
Here’s the galley countertop – the darker yellow foam is high density for the faucets area.

20150326-224003.jpg

20150326-224023.jpg
These four pieces (various galley parts) are what took 3 hours to get ready – that’s about par for our course.

20150326-224143.jpg
Getting the vac bag placed so that it draws in tight against inside cut edges, like the sink and garbage cut outs here, is not yet mastered. With this under mount sink, that edge will show so we’re guessing there’s work to do after un bagging tomorrow to clean up those inside rims. It’s tough to get enough loose bag in all the right places as the pump quickly draws down the pressure. We could do some practice runs without epoxy, but I’d rather just assume today was the last need for that kind of piece on this boat! :)
Bought some hardwood tonight so tomorrow we can tackle the plumbing thru-hulls. Best done with a sober and steady hand…

Working the exterior punch list

A tough thing about the boat build is seeing the calendar slide by without getting to true completion on key stages. So many things need “just a little more sanding” or are dependent upon another part or supplier, etc. But it’s been helping to have milestone goals, such as Finish Exterior Fabrication before returning to cabin fit-out work. We’re checking items off the shop white-board every day on the drive to finish exterior parts and hardware fitting. The reward comes this weekend as we get back in the cabins for the home stretch to painting.

We were going to make fiberglass backing plates or buy G10 sheet (yikes expensive), but decided hard woods would be a better fit. So, hardware mounted where the backing washers & nuts are hidden from sight get 3/4″ marine plywood and pieces in view inside the cabins get chunks from a hard mahogany stock. Here are some plates to back up winches, docking cleats and pad eyes.

20150318-234538.jpg
When the taller people come aboard, you’ll appreciate the counter-sunk holes for the bolt-ends, ie they shouldn’t be catching anyone’s scalp.

Fresh air will be ‘always on’ with this dorade vent. It has a clever catchment to leave splashed water out in deck, not dripping inside. This one is mounted just in front of the forecabin wardrobe.

20150318-234953.jpg

20150318-235019.jpg

The final winches mounting has finished. We’ve had five beautiful Andersen stainless steel units patiently waiting at home for years, but the new running back stays and dual mainsheet setup mean a sixth winch is needed. Thankfully our 46 Self Tailer model was on a $600 off msrp deal last week at Annapolis Performance Sailing so we snatched that up. It clawed back quite a bit of the savings from not having a traveler system, but it makes sense. Here’s what you get when lifting the drum off an Andersen for installation or maintenance.

20150318-235602.jpg
Spin it around and it’s like watching a fancy old clock work. It’s so pretty we really MUST commit to the annual maintenance on these beasts.

Charlie was at the shop eagerly sanding away at some fairing work when he spoke up about “maybe not enough reinforcement around the steering bearing plate”. I’d had a similar thought a week earlier, so with two opinions it was time to beef it up. A bit of carbon to the rescue.

20150319-000013.jpg

All the steering gear worked out well. But I forgot to photo the final assembly. So that will have to wait until it’s painted and I’ll save the work in progress photos for you.

The shop went dark for 4 days in order for the builder to sail little trimarans. Huge thanks to Jared and Paul, owners of Pierpont Performance Sailing, for hosting a Weta spring break getaway at Lake Nacimiento in central Cal.

20150319-000403.jpg
The boat sharing worked well and I got at least 10 hours at the tiller – here in some light air:

20150319-000522.jpg
Got my hat handed to me in the match races by Bruce the Weta class prez with his yellow boat, but learned a bunch. Great weather, good camping, delicious campfire dinners and really swell folks to go with gusty air lake sailing. The Pierpont guys do charters of hot boats in Cal and Mexico, including single berth slots on events like the Newport to Ensenada and Baja HaHa. Good stuff – at PierpontPerformanceSailing.com

Composites instead of steel bow eye

As we finish up the exterior of the whole boat now, there’s a short list of ‘modernization modifications’ that should be done because better ideas have come along since this build began nearly 20 years ago.

The six foot bowsprit gets a bobstay from the end of the pole down to the bow of the main hull just above the waterline. We have a stainless steel u-bolt installed to carry this big load as the spinnaker pulls up and forward. But the u-legs are not in line with the force, and the backing plate is measly. Over time, and probably way out on an ocean, this will become trouble.

20150311-225726.jpg

20150311-225747.jpg
First we tried removing the fitting, but the epoxy was bonded around the threads so this thing was never coming out. We cut and ground it below the surface and entombed the legs and nuts in the new reinforcements. The new hole was cut about a half inch aft of the point where the hull sides meet to form the bow stem. The tube shape is a 1-1/4″ PVC pipe.

20150311-230135.jpg
Inside it got a wedge of high density putty that makes a solid wall, then uni fabrics to spread the load, take over for the PVC, and tie the two hull sides together. The access was tough, reaching just far enough inside the watertight crash bulkhead.

20150311-230426.jpg
Then from the outside we ran strips of uni through the tube and radiated the ends out around the hull about 4″ on both sides of the boat. Three extra layers of uni glass were laid along the pull direction, and that’s what made a bulge on the bow stem just above the new hole height.

20150311-230742.jpg
Then some ‘finish cloth’ bidirectional 6 oz was added to tie it all together before fairing.
Here’s the work in progress after two fairing passes.

20150311-231014.jpg

20150311-231030.jpg
The new bow hole seems plenty strong to better distribute the sails’ force, and no chance of leaky and fatiguing metal. Feels like ten hours well spent.

And here are the photos I mentioned last week about saving some $ on more metal fittings. These are the attachment points for the nets up at the bow, by the anchor. Sort of mini versions of the story above.

20150311-231921.jpg

20150311-231936.jpg
The exterior punch list is almost done, and we’ll get back to the cabin build by late next week.

Some days the boat kicks your butt

This little pile of fiberglass fabric doesn’t look so bad, right? It started the day headed in to the floats to glass in the chainplates.

20150304-190732.jpg
But crawling around inside these outer float hulls in the dark with no soles (floors) and stoop over headroom makes for a challenging day. The builder gets to do a circus acrobat move to get thru the bulkhead opening seen in this shot.

20150304-191029.jpg
These lamps got the air temp to about 120 and the radiant heat was well in to the 160 range without trying to put this 35′ boat in to that auto paint booth we saw the other day! So it’s a localized heat post curing process inside the floats. The other side is under the lamps as this is written, with a sore back and various bruises. Boat bit back a little today, but she now has very strong anchor points for the 50′ mast.
Here’s that finished chainplate from forward, facing aft:

20150304-191447.jpg
And from aft, looking forward. The glass looks a bit green in these photos – that’s the look of the resin still in curing / hardening mode. In a few days it will go basically colorless.

20150304-191542.jpg
Five days of work, and all most people will ever see are these innocuous little stubs on deck:

20150304-191643.jpg
With a bit of shaping around the base, the Colligo “Terminators” fit right in. The last step is some lightweight finish glass cloth around the fitting up on deck – that’s a tiny job in the scheme of this project, so we’re pretty relieved tonight.

20150304-191852.jpg
Looking over the master to-do list, seems we’ve past the milestone of completing major structural builds. The chainplates had been looming, and the rest is non-load bearing / furniture type stuff, then fairing,sanding and prepping for paint.

The purchase order for the sails went in this week. They should be built during March, and delivered before the boat is launched. Keith Burrage of Skateaway Designs and I have gone over the measurements many times and he’s got a really exciting sail plan for the boat. This is so much better than the earlier assumption that we had to launch first with used crappy Craigslist sails and wait months before a sailmaker came to the new boat, took measures and went away to build. Instead, the drawing is done and we’re ahead of the loft rush during winter for Maine Sailing Partners. We even get to pick three colors for the radial cut Reacher! Jeanne, get the colored pens out for options…

Who had an EasyBake oven?

I remember the TV commercials, but never actually saw one. Did people eat the cookies that came from those things, ’cause I’m wondering if they ever got hot enough to actually cook? Turns out an automotive paint booth goes up to about 175degrees max; our epoxy can be post-cured at 70 degrees F for a week, or 3 hours at160 degrees. A while back we decided all low/no stress parts, like interior furniture or hull fairing, would simply cure ambiently during the warm weather. Recall last year we made a big Sheetrock box and a dozen heat lamps to cure the beams. It was a big pain in the rear but worked ok. Of course that box ended up 6″ too small for the daggerboard, and I was grumping about. Neighbor John with the exceptionally restored ’66 corvette asked why I didn’t just take the stuff to Harry the car painter? “He knows how to deal with fiberglass…”
The Sheetrock box went away and over a year we built a pile of stuff for the curing oven, capped off by the chainplates. Today was the day for PrismaCar’s paint booth.

20150302-230033.jpg

20150302-230053.jpg
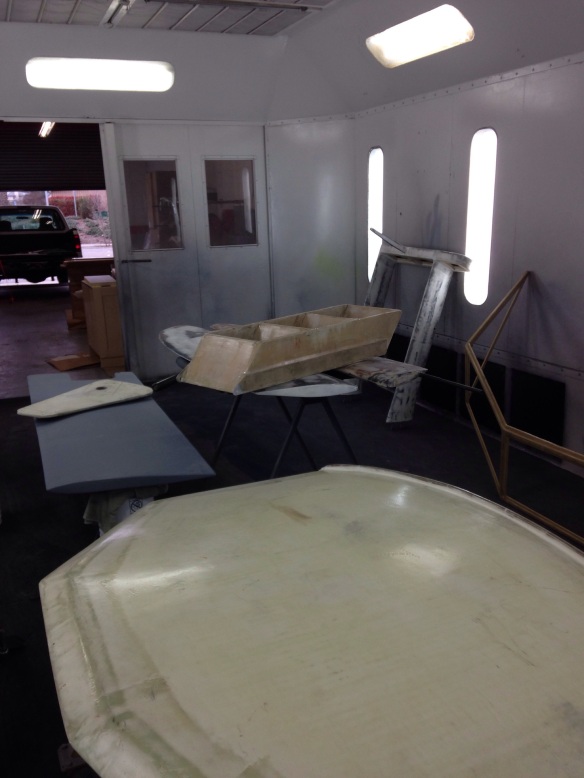
For our records, the booth ran 3 hours at 170 degrees to cure the dagger, both rudders, all steering parts, chainplates, mainsheet anchors, windshield, hardtop, boarding ladder, stern tower, windlass platform and boom end insert.
Thanks to owner Harry Strouse for the $50/hr cash rate – worked out well for both of us. And the shop guys were amused by having to move a car out of the booth for these weird boat parts.

After the field trip, the chainplates went directly to their new homes. Here they’re wedged / suspended in position with some of the bedding compound applied. Tomorrow will be the rest of the filleting and maybe the glass work.

20150302-230627.jpg

Deck hardware continues to be test fitted, then all holes over drilled and re packed with epoxy putty, hardware final fitted then removed for the paint job. But there are a few permanent mount metal and carbon pieces that will get painted in place. Today we bonded on (and bolted) the receiver points for the aft beam triangle braces. These were a lovely aluminum welding job done nearby. Yesterday the pieces were chemically etched with the West Systems aluminum prep (a two part easy to use ten minute job – buy the small size as it goes a long way) then coated in clear epoxy. They were dry and ready for bonding today.

20150302-231156.jpg
The window cutout made it an easy-reach one person job to tighten the bolts. That was just coincidence, not swell planning.

And at days end we “paid” for half the morning bake by figuring out to eliminate some hardware up on the bow – we’ll see how that turns out tomorrow.

More of anchoring stuff down

Seems to be a theme around here right now – make sturdy bases for the sail rigging. This takes many forms.

Keith pointed out that the cap shroud chainplates as shown last week really should be swiveled 20 degrees off the centerline so the pull against the big clevis pin would be directly in line with the mast. He’s right, and this is another small improvement modification beyond the decade-old F39 plans.
Cutting that bulkhead slot was tricky last week, but a $2 short blade for the sawzall made the extra 20 degree slice easy.

20150301-205111.jpg
So now the plates fit at the new angle.

20150301-205207.jpg

Next up is a place to attach the twin mainsheets. Remember these are arranged in an inverted Vee off the boom, eliminating a traditional traveller. So we want the lower mainsheet blocks far outboard for good sail control. Again, not in the plans so we thought up this:
Big sturdy triangles glued and bolted to the hull side. First make a mold for the carbon fiber layup:

20150301-205514.jpg
The rod made it easy to rotate the piece as ten layers of various fabric orientations went on. This thing should be plenty strong.

20150301-205621.jpg
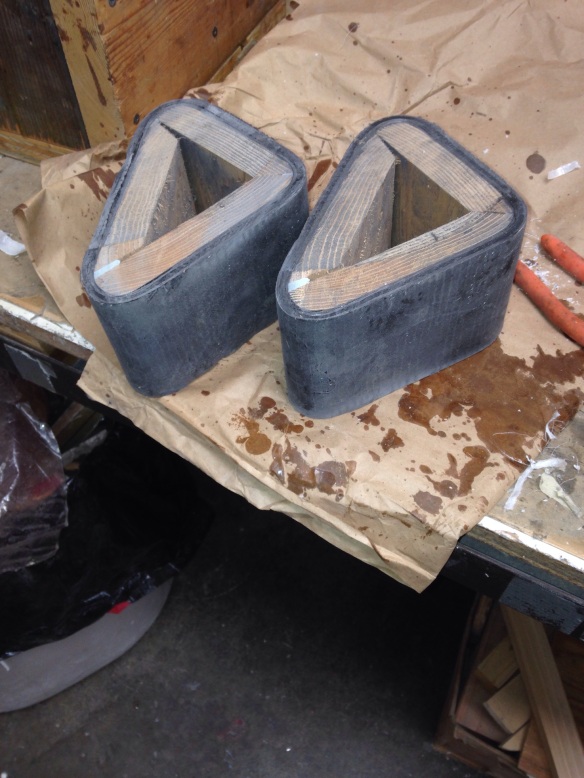
It was cut in two, and the form knocked away after this next photo. Tomorrow morning it joins the other pieces headed for the post-cure oven.

20150301-205818.jpg
And here’s roughly how it’ll go on the hull:

20150301-205912.jpg

Gotta get up early to load things for the big oven post cure bright and early Monday. Stay tuned!