Goo & paint

It’s good to have deadlines. The shipping container for the mast has to be loaded next Friday. My flight home is tomorrow evening. So it’s been a super push to get this stick finished.

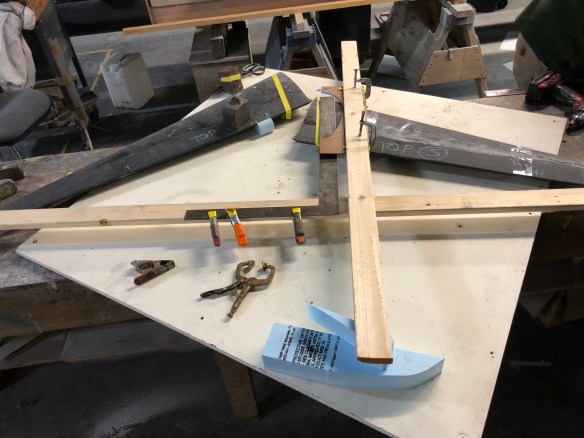
Here’s how we made the spreader reinforcements.

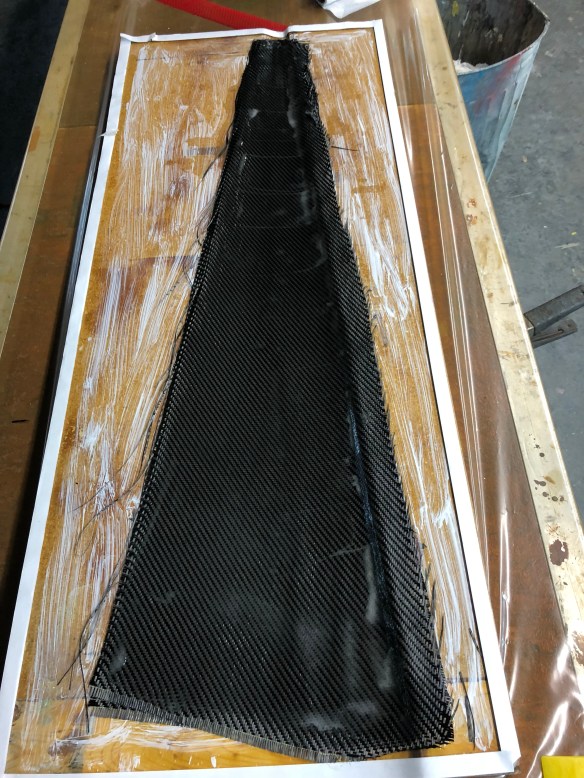
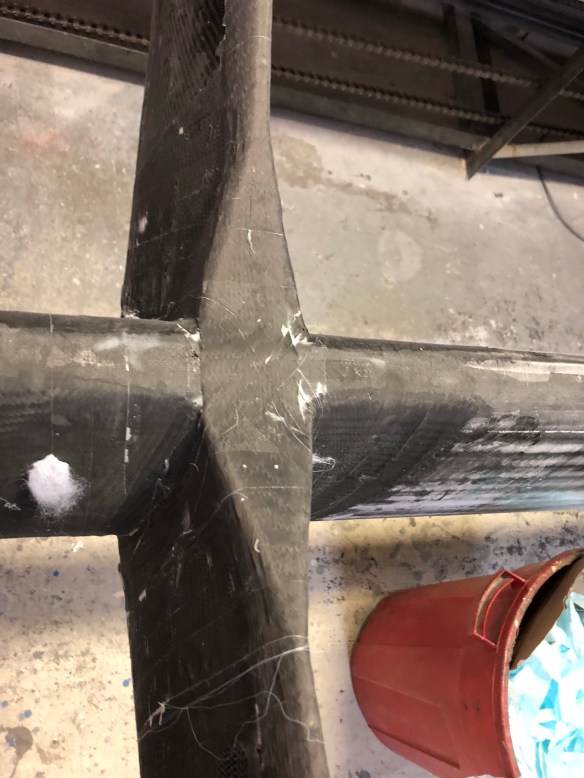
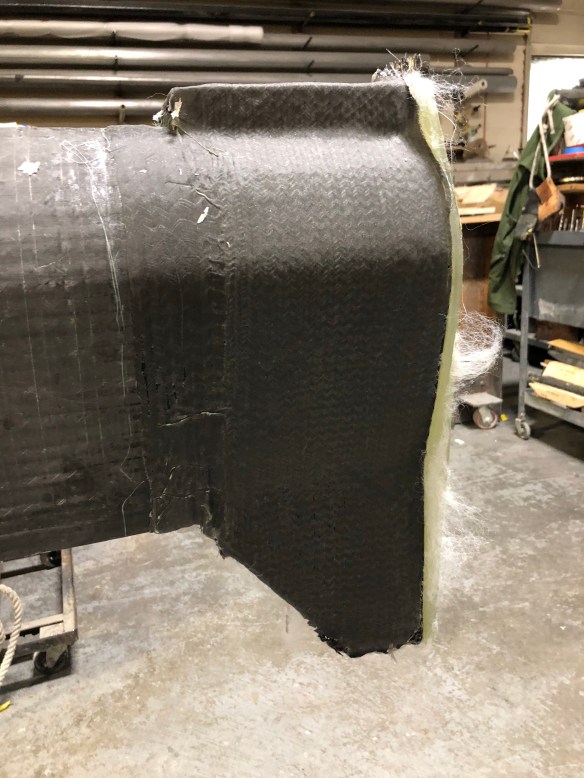
Large strips of the flattened out carbon and glass braid span the leading edges, tying both sides together. And it’s the same across the aft edges, with some rebating below the saitrack strip area so the braid buildup doesn’t hamper mainsail raising.

Thursday I did the external reinforcements of the forestay / capshrouds hound.

That’s 3 layers of 11oz carbon twill at 0-90 perpendicular to the mast, 3 more at 45-45 in the direction of pull, then two of the heavy double braid ‘primary straps’. I’m leaving those visible in the final paint job.

Friday night and Saturday morn included final shaping of the masthead, and precision drilling for the masthead sheave pins.

And during all these finish steps from Tuesday to this morning (Sunday) I’ve been doing all the fairing work around the final fabrication stuff.

And suddenly Sunday at 1pm it was time to roll in to the paint booth!!!

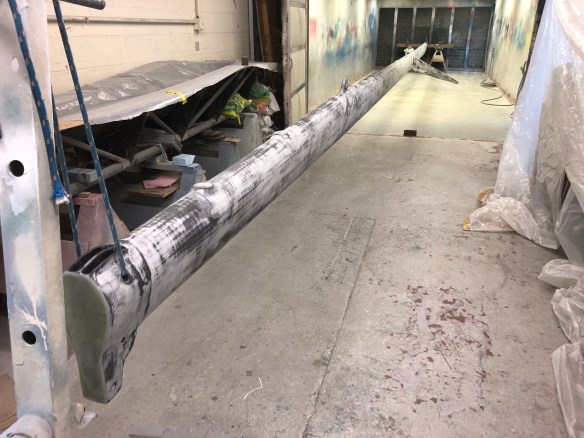
CE’s owner Ted was jamming at the other end of the shop on the big 12 Meter boom, so we stopped for lunch and talked through how I should work the primer. He got the equipment going, demonstrated for a few feet, and handed over his spray gun…

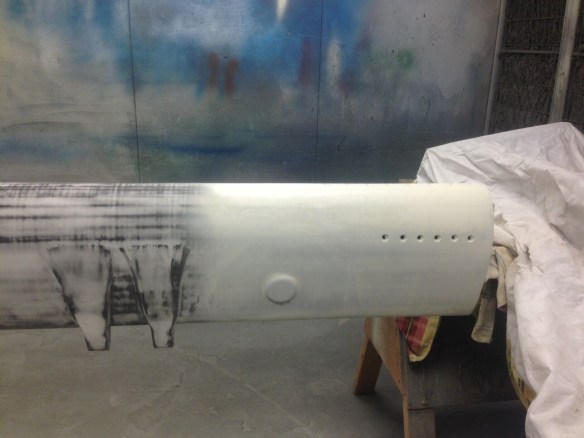
I shot two coats of primer, and tonight went around filling pinholes and blemishes. Interesting they had me do that with simply some of the leftover un-thinned primer that had been set aside to begin curing in a pot. About two hours after spraying, the little pot yielded gooey paint that you trowel on just like a thin fairing putty. The advantage is that tomorrow these buildup patches will sand just the same as the rest of the surface.

Tomorrow I hand the project back to Composite Engineering’s Will and John to finish the painting, drill and bush the hound-hole, install the foot insert, drill & tap the 200 Tides SailTrack clips, make the 11/16″ masthead sheave pins, and coordinate diamond wire install with the riggers. They’ll be rushed to get it all done and in the container by Friday.

Honestly folks, I’m beat. When Keith and I wondered about me coming here to help once the spar was out of the oven, I had no clue it would be three straight 80-hour weeks as the primary fabricator and project manager. But in the end, Ted said this evening we did a great job creating “a century-lasting mast” that will make the boat perform at its best. We won’t be able to wear this one out. I know it’ll all be worth it wherever Ravenswing is on the planet and we can look 54′ up in the air with total confidence. It’s been 13 months now Jimbo; soon we will be sailing again.

Now it looks like a mast

We showed you the completed spreaders about a week ago. Their attachment to the mast had to wait for foreman Will, over on the other big project in the shop (more on that later). Our spreaders are a little tricky to mount, needing both a twenty degree sweep-back and an off-level tilt to accommodate our desired 5 degrees of mast rake (how much the mast leans back from vertical on the boat). All of this gets accomplished with custom wedges on the band saw to cope the spreader roots to the mast wall, and jigs to get the sweep right. 
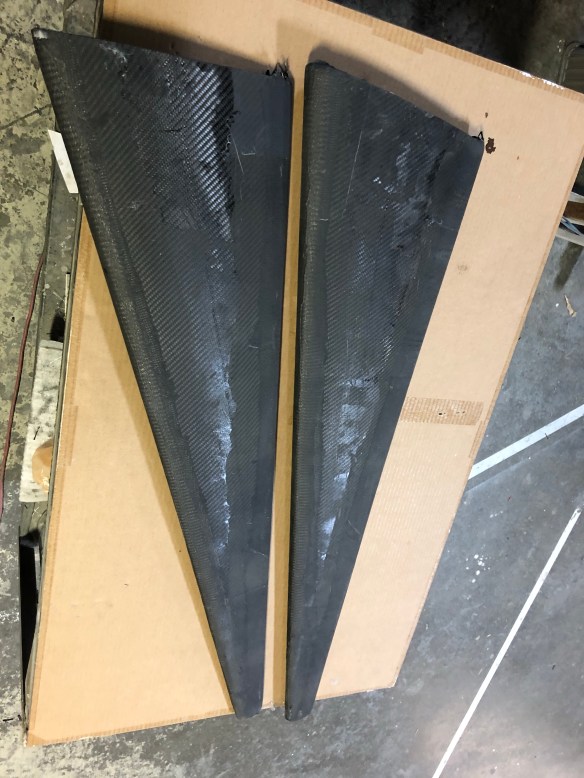
Because I spent most of three days building them, I could barely watch while Will cut them to fit the mast. But all his calculations and jig prep paid off. 
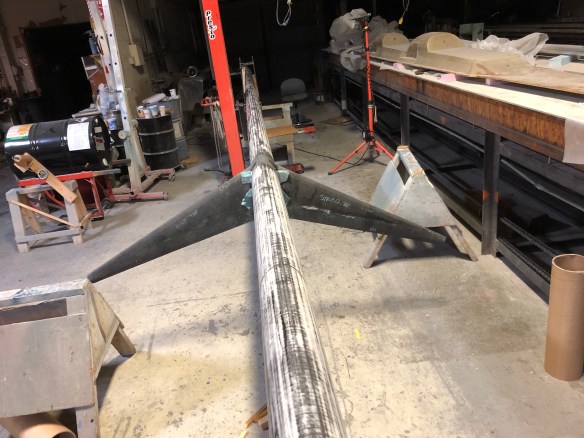
Tonight they are barely tabbed on. Tomorrow we’ll do significant connecting reinforcements. And as both Keith and I have ripped carbon spreaders from a big mast before, yes they will certainly get uni-strapping that connects them around both the front and aft walls.

Last week I built the foot insert and was going to wait until it was installed to show you. But we decided to hold off further in case the lower diamond terminals need better access. So here is the unit that will transfer the load from the mast walls into the rotation ball on deck. 
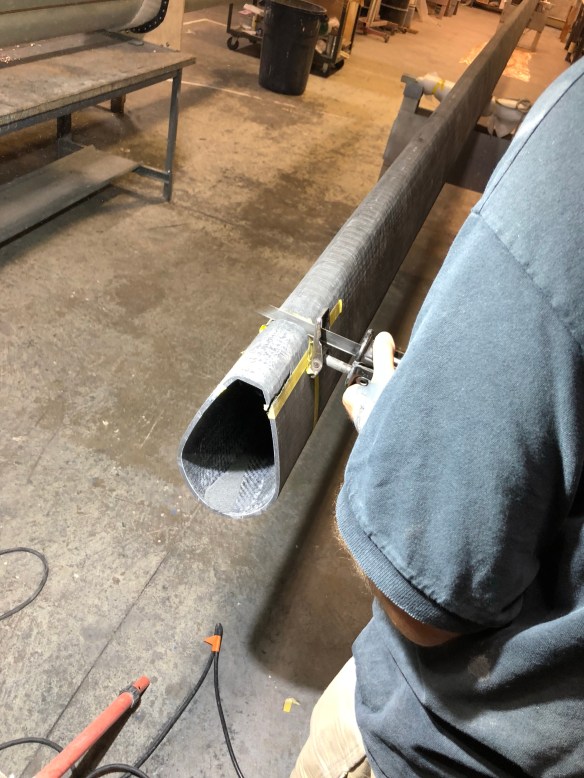
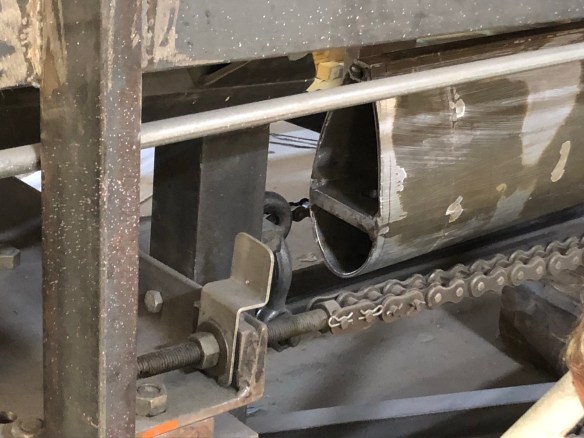
If you knew our first mast, that six-hole pattern at the bottom is where the same steel cup will be screwed in to the mast. Here’s the view the halyards will see – very clean access around this foot piece, and ZERO protrusions into this mast above the foot all the way to each halyard’s exit. No wires, no cross bars, no bolt heads. Our design goal was a totally clean inside to minimize any halyard chafe on extended ocean passages.

Now a bit of shop politics. Back in June we discussed the bad schedule slipping and the two projects still in front of us. One is a 60′ mast for a charter boat under construction. Luckily for us, the Coast Guard approval has not yet come through on those plans, so we got bumped ahead. The other project is the boom of an older America’s Cup 12 Meter class boat that is currently for sale. That boom is using the same carbon spools as ours, so they were braided back to back. Composite Engineering agreed that if I came to work here they could epoxy-resin-infuse ours first since it would need more finish work. And because ours was infused the night I traveled east, I offered to help infuse the boom so I could see the process they used on our mast. Turns out, the boom’s infusion was much more complicated because its fabric layup changes significantly along that spar, compared to our relatively uniform mast spar. So for you infusion veterans, this means three separate plumbing circuits all had to be managed in one big vacuum bag. One, because once it goes into the autoclave and the whole thing goes to 44psi, having separate vacuum circuits becomes irrelevant. (They shut the vacuum circuits down once the autoclave reaches its own high pressure). In a couple of these photos you’ll see the resin spreading into the peel ply. Notice it go from dry (light green) to fully wet out (dark green).

As the rookie, my job of course was epoxy mixing boy. Don’t spill, nitwit!

Once the bosses were sure all fabrics were infused with resin (there was quite a dance to manage on/off timing of three feed and vacuum circuits), it was time for high pressure and heat curing.

CE ramps their epoxy up slowly( they find this best for eliminating trapped air bubbles), so this was 120F for two hours then a trip up to 275F or so and we left it for the night. It’s all computer programmed, both heat and pressure timing. Because of the multi circuit plumbing, and some VERY heavy carbon layers near the boom vang, we went with extra resin and expected the resin traps to catch the wicked-out excess. The pot closest to the central plumbing picked up it’s full share!
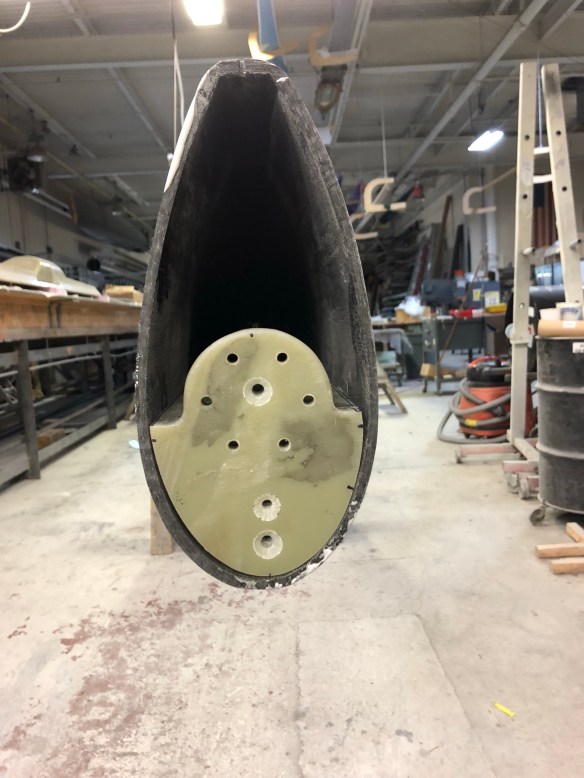
That’s wasted money (excess squeezed out resin) but very much calculated into the project management of risk-reduction; you must avoid dry spots in the laminations at any cost.

I said ‘politics’; that includes horse trading. So that the skilled guys could work on our spreaders, I offered to unpack the other customer’s boom. Those disposables (that wick away the excess epoxy) are significant muscle work to remove on these big projects.

And because they’ve taught me with the Sawzall on carbon, I cut the three foot by 5/8″ precision main sheet slot in this thing today, including nice radius edging and line exit ramps. On Monday this boom is headed to this boatYou can search it on Yachtworld where the description says the motivated seller has pumped $1.5mil in to Enterprise but will let her go to you for $800k. I didn’t know those numbers until AFTER taking the Sawzall to the thing. Whoa.

I put in about ten hours on that boom, all of which meant the top guy didn’t and he worked on our mast instead. Horse trading.

Tonight finished up at 9:30 with the first wave of carbon laminations on the primary hound. Photos on that maybe tomorrow.

Getting close – hopefully shooting on primer this Friday.

PS – Jim, I don’t think you need to fly out. I’m working a deal with a local boat builder to share a 53′ rail/truck container next week heading to Los Gatos rowing club and to our Richmond boat yard. So I’ll be flying home and hopefully we just open up the big box on the California end. Stay tuned…

Bitching about the longboard

So because we’ve waited so long for this mast, I’ve had to eat crow on some earlier proclamations. Like the one where we ceremonially burned the long sanding board used in fairing Ravenswing’s main hull, because I said “I’m never doing that crap job again”. Somehow it ended up as working Sunday alone in one of the country’s most innovative composites shop, long boarding the mast we don’t even own yet. Geez.

At least foreman Will taught me a neat trick last week. that’s a cardboard packaging strap formed into two handles and a drag section. Think “dragging the infield” after the third inning. You spread your fairing putty quickly, working it in to the surface with the spatula. I’m working with 175gram batches, which spreads out to about ten linear feet on one side of the mast. The drag tool evens out the filler and removes the spatula lines. Here’s a look at the first pass on the port side.

This is starboard, which got its second coat fills this evening.

there’s also some handwork shaping around these hardware areas.

Tomorrow I’ll grab the long board again and attack the starboard side. After that it’s a 12″ disk sander air tool. It makes short work of smoothing large surfaces.

Goal is to get to primer by Wednesday, but that would mean the spreader installation gets completed by Weds morn. Also on the punch list is external reinforcing for the nose to make it the actual forestay hound, and for Will to finish shaping the masthead including precise drilling for the masthead halyard sheaves. The guys also have to make the three big pins needed for the sheaves and main halyard 2:1 terminal.

Some of you were probably anxious to see that nose piece slid home. All went well Saturday morning, even though I was working solo. all Sat afternoon went in to fitting the mast foot. That included over 30 threaded taps for the 5/16″ screws, plus the 8 in the nose piece. Led to rather sore wrists. The foot is ready for final installation but Will asked me to wait until we get the lower terminals for the diamond wires sorted out.

RickWS and Kieth – small change in plans, ie we’re not doing a carbon rotator arm out the front. In the nick of time I remembered that our retracted daggerboard head would conflict with the rotation control arm. So instead we’ll use the old mast’s stainless steel one, this time mounted facing forward. It’s on pivot bolts so it will just swing up to clear the dagger when stowed.

I met a boat builder here yesterday who makes rowing shell / crew training boats. He needs to ship three of them to the Bay Area around Oct5. His will go in a container and he knows how to arrange for 53′ intermodal boxes. That will fit our mast. A truck here would take it to the cross country railroad line in NY, bound for Oakland. I’m all over that one this week!

Griffin asked today what color we’ll paint the mast. I assumed the same light grey from before. But he suggests going bolder. The boom needs a repaint too, so it’ll be matched. Hmmmm, please feel free to send in your votes. But know that CE pres Ted already vetoed black – he doesn’t want his carbon work absorbing that extra heat.

If you’re going to cut carbon…

… get blades like theseIMG_0872IMG_0870IMG_0871

Yeah, the pros made me cut the end off the tube to officially create the “zero line” of the bottom of the mast. Some kind of right of passage thing. Back to the gooseneck:

Will showed us how he wants the braided carbon to lay down. IMG_0885IMG_0884IMG_0883The pieces were wet out on the table, and because it’s thick, very high density braid, I literally mashed the epoxy in with my boot heels before laying it out over the mast. IMG_0889IMG_0890

These parts also got the super-tight peel ply, breather and tape method overnight.IMG_0891IMG_0892IMG_0900IMG_0901IMG_0902The boss inspected later in the day and was very happy with the lamination results. Gooseneck built – just needs fairing cleanup to go.

The various halyard interfaces all got their final fiberglass-over-carbon layers. There’s only one exterior reinforcement to go, the nose of the mast. IMG_0880
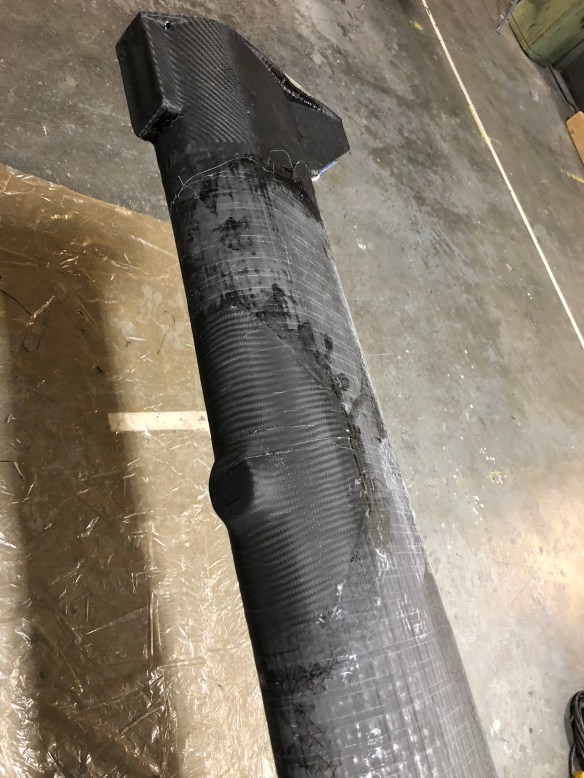
The nose plate (point where the standing rigging attaches) is made of three pieces of G10, bonded and screwed together before being bonded and screwed into the mast tube. IMG_0873IMG_0899IMG_0898IMG_0896

In that middle photo above, note the buried threaded rod in four spots on the side – that along with epoxy glue is holding the three elements together. This part had to cure overnight before it could get final shaped and dry fitted into the mast today. Approaching the mast, it started with an hour of careful measuring up from the plans. IMG_0904IMG_0905IMG_0906
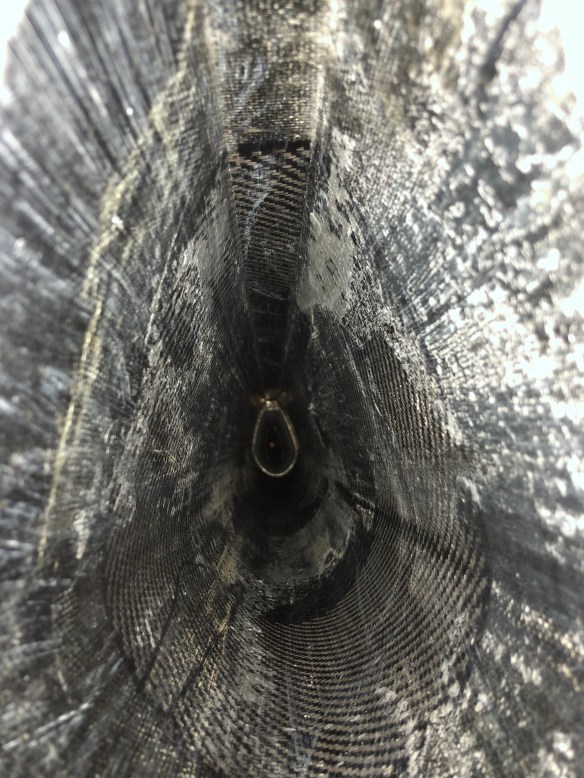
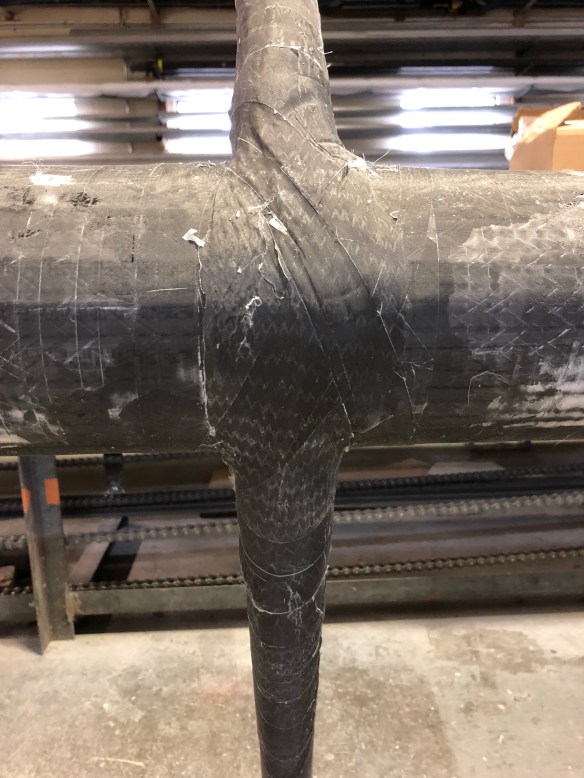
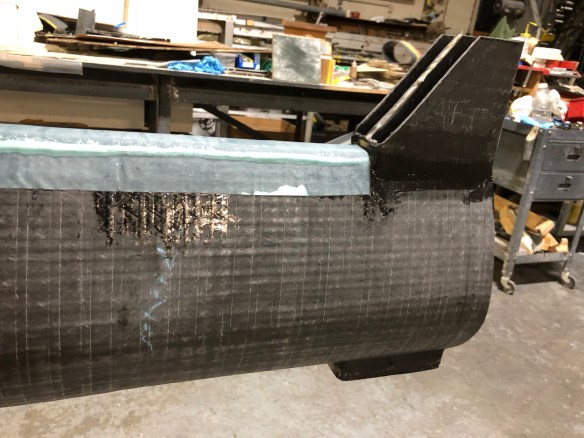
this old sanding belt lined up edge to edge helps us translate specific height-on-mast points around the full spar. The fabric curve in that photo is an externally applied reinforcement of carbon braid for the jib halyard exit area (we add back around the slot), and it is fanned out like the you saw in the gooseneck. IMG_0907
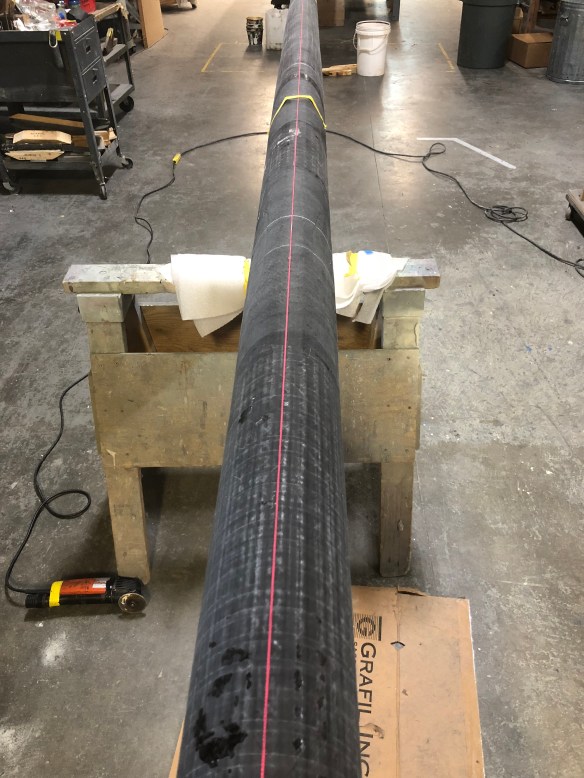
The slot was cut and cleaned with a drill, sawzall, router and small disk sander. The electrician’s fish tape was sent down from the new hole, and the part drawn up on a string. IMG_0909IMG_0911IMG_0914

The screw holes were accomplished by hard-lashing the part up against the inside of the front mast wall. I drilled and tapped right there in position. IMG_0912IMG_0913

That took until 8pm, so Saturday morn the nose part will see daylight one more time, being pulled back out the bottom, buttered up with epoxy glue, and drawn back into final position. So here’s the jib control layout: the forestay gets attached to this new hound. Looking down the mast, you see the jib turning block pad eye next. And below that we routed out the jib halyard escape from the mast tube. The jib halyard sees zero internal mast hardware to chafe against. Pretty slick.

All composite parts have  been fabricated. Just the bottom structure and the spreaders remain for composites installation. We also got started with New England Rigging today for the diamond wires. The owner says he can have all the parts ready next week. On we go.

Career Day

Did you have that day in school where parents came in and described their jobs? Yesterday felt like the reverse, as the shop looked like I was doing my son’s job – a good Paramedic, patching up boat parts:
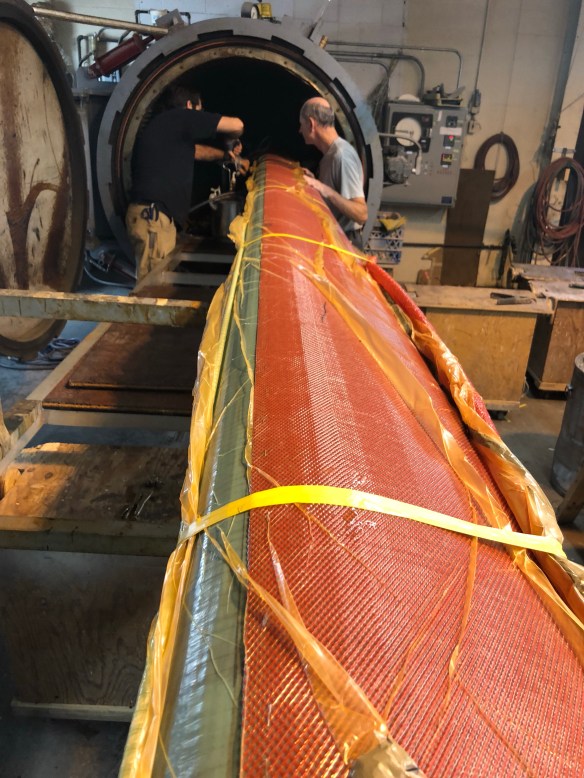
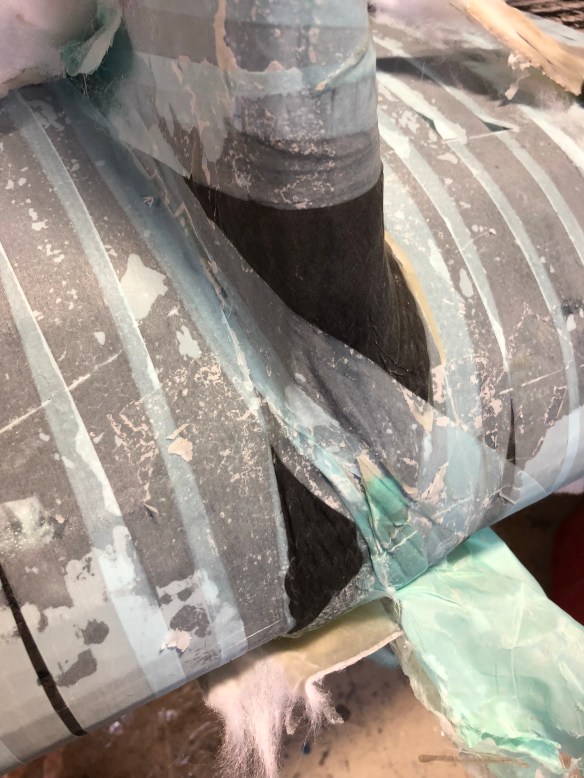
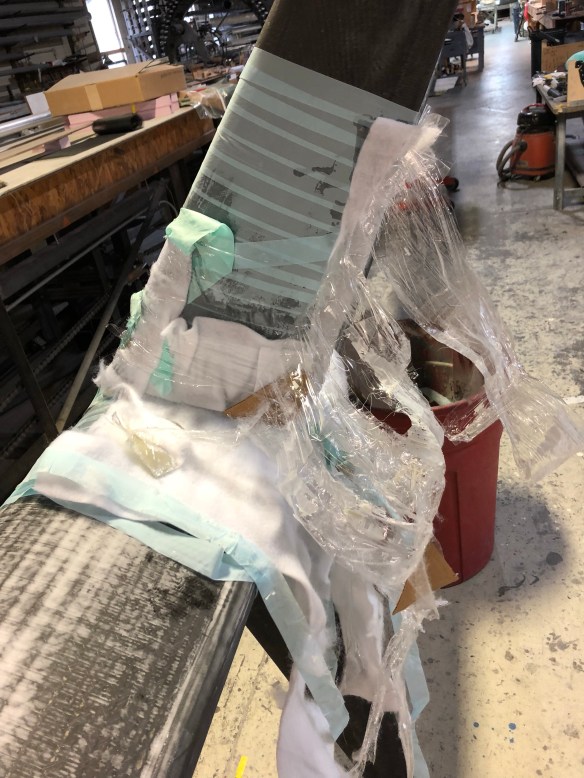
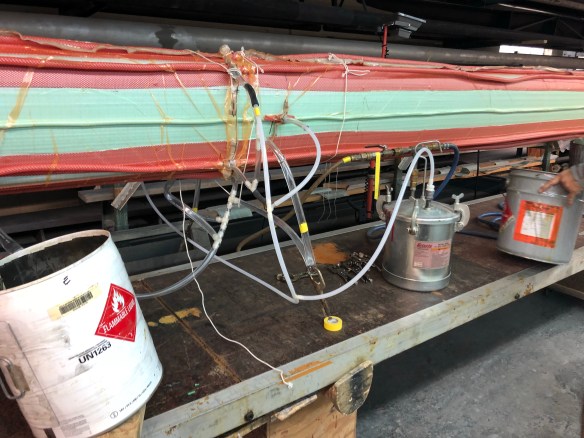
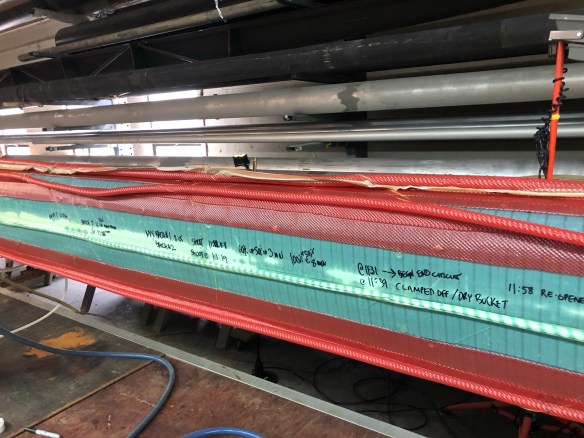
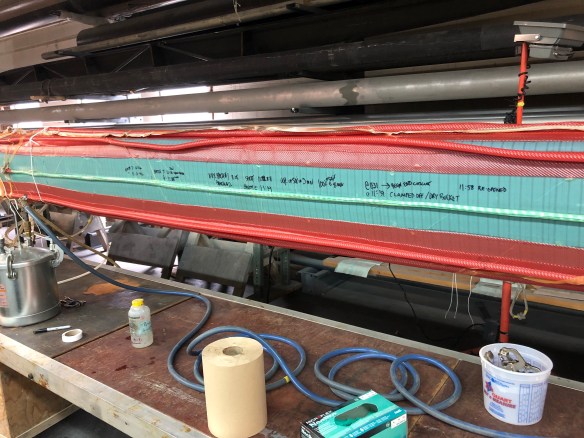
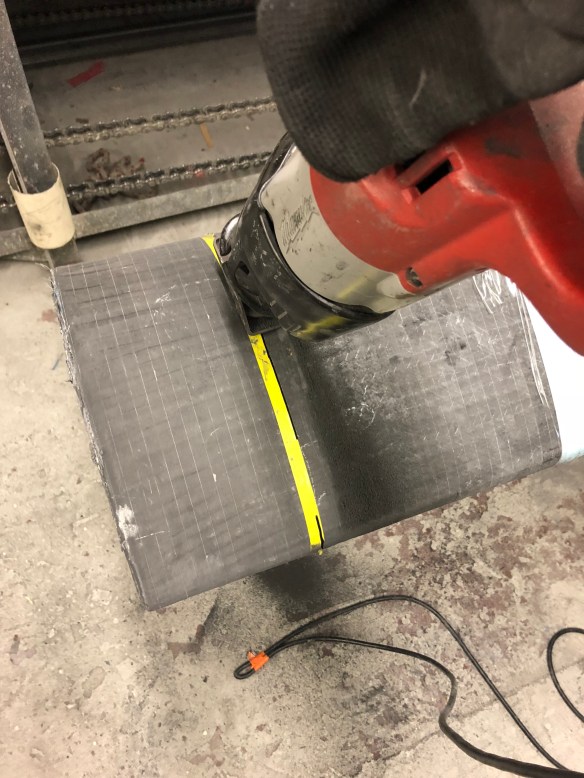
For you fabricators reading this, I was impressed how these guys achieve resin saturation and excess absorption into the bleeder cloth by using pressure from tightly wrapped packing tape and clamps, where vacuum bagging is impractical. We are using this technique to apply the outer carbon reinforcements to the mast head, the gooseneck and six padeye bases along the mast. They also had me do that to the spreader trailing edge wraps last night. See them ‘bandaged up’ and then unwrapped below.

This afternoon we received plans from the engineer / company president for the composite primary hound, and for the web system that bolts and bonds into the bottom two feet, transitioning all the forces from the spar down through the rotation ball and into the deck and compression box below. The load numbers for this boat and rig are so much higher than the trailerable Corsair tris, especially because the righting moment is orders of magnitude greater. So the gear inside the bottom of the mast is REALLY important to get right. You’ll see it develop in the next few days. Tonight I’ve started cutting out the pieces from 3/4″ G10 plate. Back at that old, fantastic big bandsaw…

Yesterday we got a little box from France with my new boat jewelry. You can ask RickWS just how important this $550 “Jesus shackle” is. It’s the only connection point on the mast for all three primary standing rigging lines. The engineer needed it to take measurements that affect the primary hound final design (that’s where it goes). So now we begin that fabrication. And no, it didn’t come in a robin-egg blue box with white bow. Just a packing list from Wichard.

Saturday Gooseneck Night

Hope the rest of you were groovin’ Saturday night (Allie!). We started the gooseneck (part that connects the boom to the mast).

The wood block is standing in for a big aluminum toggle that will bolt in to the boom end, and hinge here on the long bolt shown.

The afternoon was spent laying a glass layer all along the mast track base. 51′ of tedious handwork, squeezing out every bubble.

The morning was fun though, translating the 2-D spreader plan to cutting out the real thing. They needed a little fill love on the leading edge before taping those edges closed tomorrow.

And here’s one more shot of Will’s beautiful work building the masthead crane / sheave box last night.

…plowing ahead here.

PS – Canada Bill, thx for the encouraging voicemail. Yes, see you on the boat in Mexico soon. Banderas Bay Regatta 2019, baby!

Fabricating mast parts

It was a busy work week here making the components that transform the raw spar into a sailboat mast.

Spreaders progress:

ppThe foam core was bonded in then next-day trimmed down flush to the clamshell glue line. Here are two tools I used.

That big stroke sander stands 7′ tall so the return belt doesn’t hit you in the head. The whole table slides on roller bearings and you press the moving belt down where you want to remove material. Amazing.

The spreader tips had the foam excavated and replaced by G10 pucks that will handle the diamond wires. 
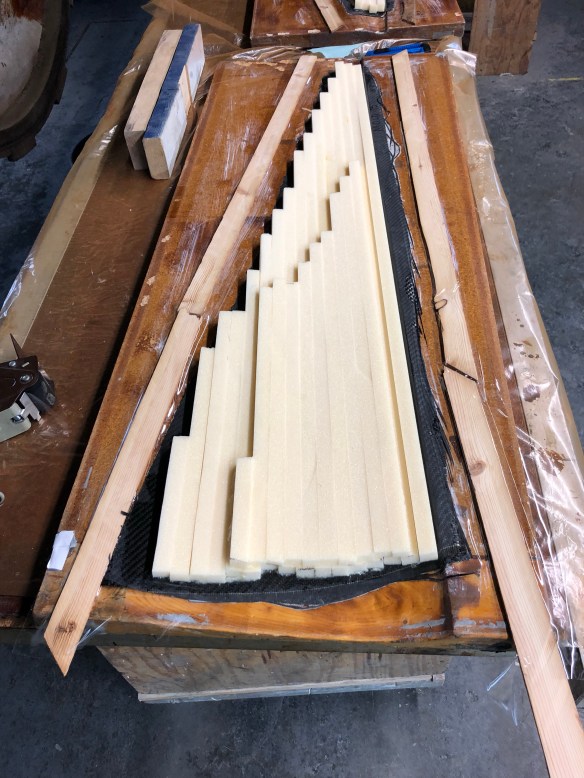
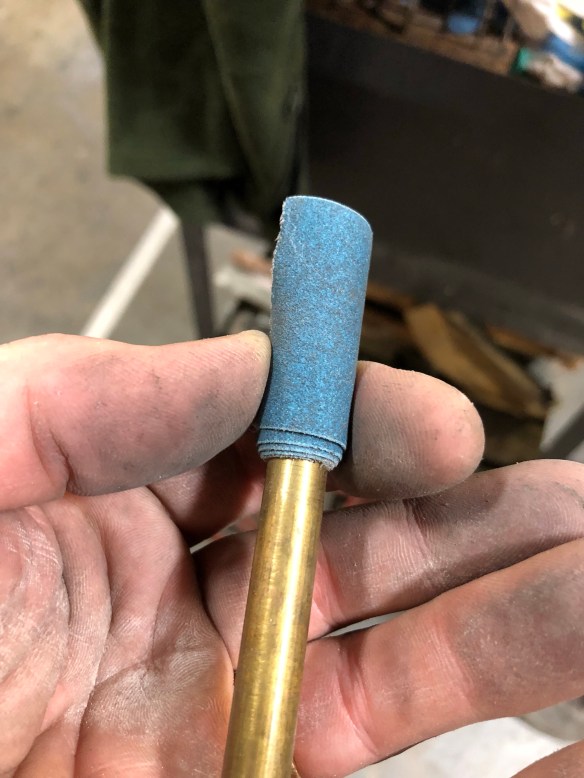
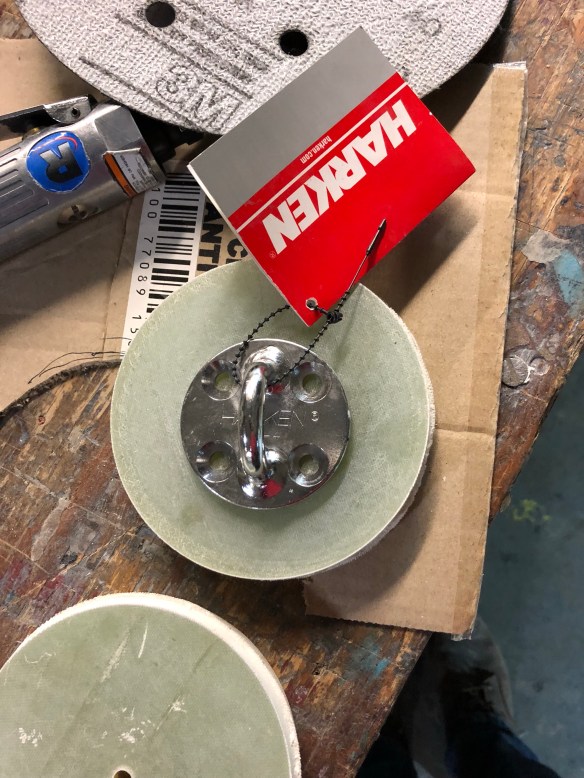
after the band-saw rough in on those pucks, this tool was my shaping friend.

We put half the spreaders back into the molds and glued the upper half on to each. They came out nice.

Next was finishing all the padeye bases for the front of the mast.

Spinnaker is the round one at the top, reacher and backstays go on the bigger diamond style one. There are carbon laminations to do over these next week after some fairing.

The halyard sheave box was cut from the large section built in the prior post.

Two pieces were taken from this stock, and glued together for our mast head.

It got notched into the mast tonight.

Pretty amazing Sawzall cutting by Will. Not like my first sawzall experience with Eggleston cutting away the bedroom wall studs in our Ashland house to make a bigger living room – in the carbon shop it’s more a precision thing :)

Building tip – look at this clever method of spherical sanding inside holes or inner corners. Love the simplicity and effectiveness.

A Spar Is Born

3pm eastern time, 9/11. 274 lbs. 55′ long (will be losing 6″ top and bottom for 54′ final height)

The middle photo shows that the top 8′ are tapered, to save weight and windage aloft.

Getting that huge aluminum forming mandrill out turned out to be the toughest thing in this whole 6.5 year boat build. Thank goodness that hurdle was passed!

Here’s a minute of the six hours spent today finishing this job.

The sheave boxes that will hold the masthead halyard turning sheaves (blocks) were weaved and laminated today. That’s cooking in the autoclave tonight, along with the post-cure of my second spreader.

Here’s the end of Will’s process on the sheave boxes. The epoxy was brushed in at the center of the laminations, mixed to the exact resin to cloth ratio spec’d by the engineer, and it will bleed out through all the fabrics in the autoclave vac. bag process. It was a complex series of fibers, but home builders will enjoy how these guys take peel-ply to a whole new level.

And for some evening work, i got back to those padeye G10 backers. Learning to cut the coping curve to fit these pieces to the front of the mast this week.

Now that the spar is set up on work stands, I expect tomorrow we start in earnest to finish fabricating all add-on parts and make the assembly sequence plan. Good stuff and I can truly see the boat sailing again soon.

PS – boat builders or budding nautical repair types,if you haven’t mastered all things hand-layup fiberglassing and filleting, get this little boom. Russell heads up Port Townsend Wooden Boats in Washington. It was here in the shop and I read it over dinner. Sure wish I’d had it six years ago :)

Mandrill angst

As of Monday night here, the aluminum mandrill “mold” is still about halfway inside the mast. For a rookie, that’s a pretty anxious weekend. I spent six hours Fri night & Sat morn getting 16″ of movement over 6 hours. The company owner Ted came in Saturday afternoon and assessed the need to reconfigure his pulling machine from 1:1 gearing to 2:1. He and I spent seven hours moving gears, huge chains, etc. They haven’t done this in many years, and once we started running again the chains slipped on the drive gears. That ended the weekend progress. CE’s Joe and Will tackled it today and finally at 6pm the mandrill moved smoothly a few feet. And then a tensioning line snapped with a bang, and we agreed to splice in fresh dyneema tomorrow. We need that process to finish!!!

Meanwhile, the shop has set me up fabricating mast fitting parts. First up, the spreaders. We’re using an existing clamshell mold, with customized fabric and epoxy formulations for the strength this mast needs. Henny, it’s really great to do this work in a big, professional shop – you’d love it here :)

First is an 11oz carbon skin, then a heavy woven uni strength braid near the center, then another 11oz inner layer.

I had my vac bag running Sunday morning out on the table, but then Ted came in and fired up the autoclave so we switched to it’s vacuum system and rolled the whole works inside.

Monday morn we pulled it out and moved on to filling each half with A500 foam core.

Tonight I repeated the layup process using the same molds, now for the second of the two spreaders.

There will be five line-attachment pad eyes on the mast. Three hold turning blocks for halyards – spinnaker, reacher and jib. #4 is for lazy jacks and #5 for Cunningham/downhaul. Each gets a G10 base built.

Keith: Ted and I decided the backstays could share the padeye with the reacher halyard, and he spec’d a big diamond one for that duty. The others get the smaller round one.

CE’s shop foreman Will did one and turned me loose on the other four. This massive, accurate bandsaw will have Mike Leneman drooling – it’s amazing, cutting 1″ G10 with ease.

Speaking of Keith, I called the other day to find he and Val at sea on their excellent St. Francis 44 cat. Sounded like a good trip off NY/NJ. Here’s a taste of how that “sailor’s cat” goes, from my visit with them in June. https://youtu.be/hdvQb8yki9M

Mast build underway!

We got an update last week from “Mastachussettes” that the Composite Engineering team   was pushing to complete the fabric braiding of our new mast around the aluminum wing-section mandrill. That was the cue to get on the airplane to go help with the fabrication work. I was resigned to, and kind of excited to see, the process of building the vacuum bag and infusing the epoxy resin. But the team worked hard Tues/Weds to get it done, and while I flew overnight SFO-Boston, the new mast spar was baking in the autoclave. What a relief to see this upon arrival…

The carbon fiber is hidden under all the vacuum bagging supplies. Red is the air-flow-enabling mesh. Green is the peel-ply that faces the carbon fabric. Orange is the actual vacuum bag film. It took five hours to remove all this stuff and get to the bare mast section.

While I was doing the stripping job, the CE guys began pulling the aluminum mandrill out from inside the new spar. It had been coated with Teflon prior to he fabric braiding, to enable separation. When we first opened the autoclave, for ten minutes we got the much welcomed cracking sounds of the epoxy separating from the aluminum. But there is a huge amount of surface tension in these things, and it takes a big chain-drive rig exerting somewhere in the 20,000+lb range of force to pull the aluminum section out. A plate that is just larger than the mandrill but smaller than the new carbon spar holds the carbon back while the mandrill is pulled against the big steel table.

Here’s a peek inside from the top of the mast; you can see the aluminum mandrill descending down the column.IMG_0791

Because the mast is tapered at the top, the first 8 feet or so pulled out nicely. That’s shown in this video where you can see it moving.

But after that, things slowed down and we spent all Friday taking turns operating the big machine, only getting a half inch of movement with each 10 second tug. After a half foot we have to let the machine motor rest / cool down. I’m writing this during one of those cooling cycles, and this crap will go on though tomorrow probably. Think slippery thoughts. Thx