Follow the leader

All four big crossbeams are back down on the ground, clogging up the workshop with a big push to get them faired and finished (then protective wrapped and stored away in back). The last building step is to form the net lashing rails. Earlier we saw some photos of the PVC pipe being affixed to the starboard hulls/beams. Now the fiberglass is going on – these layers will sit under the final wrap layer that ties the fairing to the beam. See the grey pipe under two layers of glass…

20131222-224543.jpg

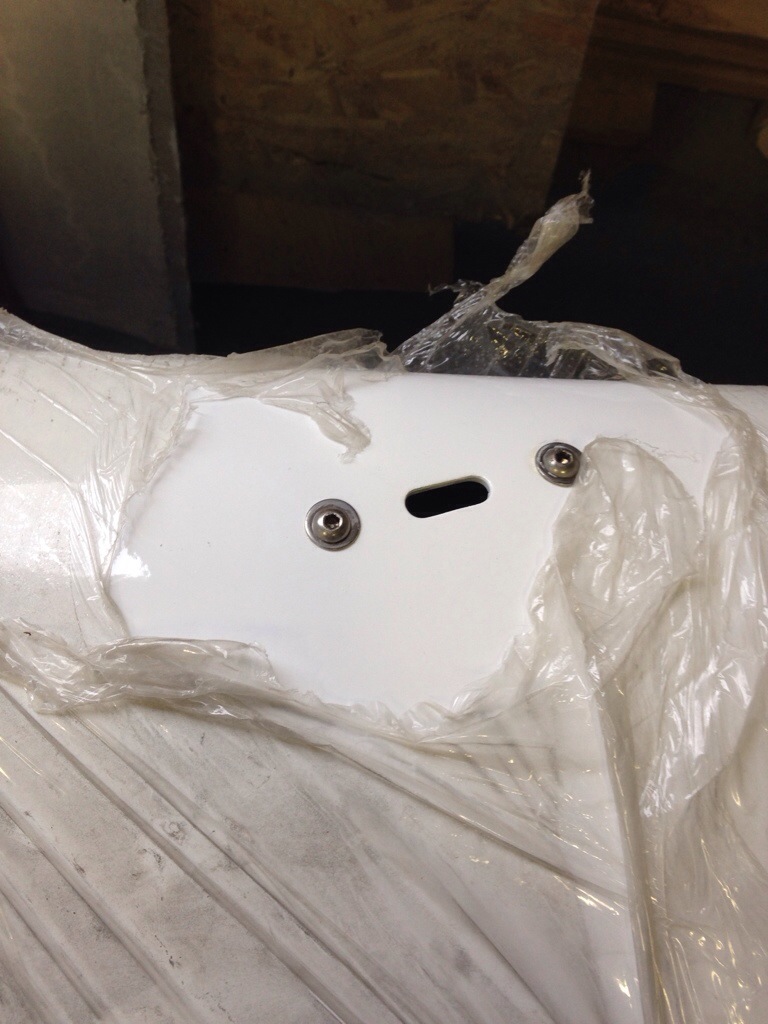
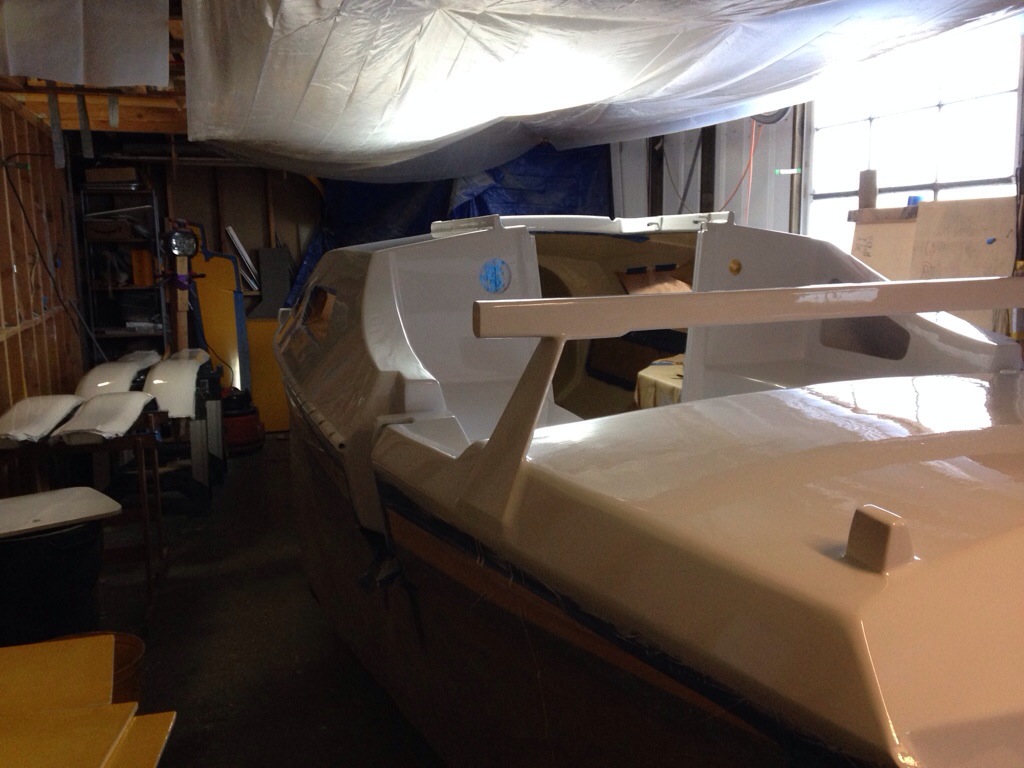
I got to visit Andy Miller’s F22 for a progress report. He’s nearly done painting; a fancy two tone job with hot yellow below the gunwale and white on deck. Here is the finished product of the net lashing rails. What’s not seen is a 1/4″ rod slid inside the tube. The slots give access points where you run a small line around the exposed rod and back to the net lacing.

20131222-225000.jpg

Can’t quite see his yellow hull as it was masked off during my visit, but the yellow rudder, tiller, etc. look great.

20131222-225149.jpg

Having a floor full of huge beams and yet another suggestion of using a bandsaw for finish work, it became time for a weekend of evening housekeeping. We moved a big pile of various parts into better storage corners, and finally tackled the problem of no dedicated vacuum bagging space. Repurposing scraps (beam mold box sides, etc) yielded a really nice dedicated bagging table, separate from my big table at the shop front.

20131222-225731.jpg

And around the other side of the boat bow we found a little corner for what’s soon to be a dusty, productive mess of shavings as the new little bandsaw and table sander get set up by the drill press, router and chopsaw. The big Bosch table saw is on wheels and has proven a fantastic purchase – that stays up front to handle large sheets and rips.

20131222-230142.jpg

I expect to get a lot of work done thru the holidays as business travel stops. And A LOT done in early 2014 – more on that development to be reported soon :)

Happy Christmas, everybody. If we can’t be out sailing in warm breezes, at least lets have some fun with families and maybe some afternoons getting the boat(s) ready for spring!

Foreign treasure!

Not all of the boat build takes place in the shop. This Sunday’s project involved an overnight flight to Chicago and early morning to Toronto, plus 40 miles of rental car in the snow to track down the 50′ carbon fiber mast acquired (but not delivered) 15 months ago.

20131211-202313.jpg

Down a long driveway outside of Caledon, Ontario is a boat wright’s workshop that is temporarily storing our mast. This was the first time seeing it, and it’s way better than the pictures! U-Spar’s craftsmanship looks fantastic.

20131211-202959.jpg

It’s a full pre-preg carbon build, with proper resin slow-heat-rise baking and well executed reinforcements. I like that they did not do material tapering on the ends to try and shave weight. It’s a uniform layup, stronger than the F39 minimum design specs, and totals about 160lbs including the double diamond stays.

Perhaps the best part for me is how complete it is, down to the windex and antenna fittings, rotation control arm, spreaders, Tides Marine track, etc.

20131211-203916.jpg

The mast crane is a separate carbon composite built to slide in to the mast. It’s set up for two main halyards, including one doubler, and two mast-head spinnakers. Mike L will happily note one of those is perfect for the big SoCal reacher, and I’ve added a set of upper cap shrouds to compensate for that extra load. We have one regular jib halyard, and a storm jib halyard exit is being added at the main’s third reef. I decided to skip a cutter stay and will sew a wire luff in to the storm sail – it’ll be it’s own stay between the deck and the halyard.

Here are a few more shots of details. We didn’t want to unwrap the plastic any further.

20131211-204825.jpg

20131211-204852.jpg

20131211-204908.jpg

The spreaders are fixed onto the mast. It makes transport more difficult but once stepped, that’s another simplicity element (no connectors to catch, erode, etc) I think we’ll appreciate.

20131211-205356.jpg

Because it’s a rotating mast, the bottom is open and the halyards will simply exit and be routed to the turning blocks in the stainless steel base. I took the base, the rotator control arm, and the shroud-to-mast shackles home as luggage. The TSA wasn’t too happy with me.

20131211-210221.jpg

The eyeglasses are there for scale of just how big the primary shackle is, taking the combined pull from forestay and windward cap shroud under load.

We’ll see more photos when the mast comes west. For now, send good thoughts for the fine furniture trucker who is supposed to carry our mast inside his 52′ trailer atop a load headed this direction. We’re not out of the woods yet…

No Monkey Business

We got to thinking about keeping the boat secure at anchor and in port. The main companionway door-boards should be both light and strong. I’m thinking I’ll make them from foam core with some carbon fiber, and add plate aluminum as a security measure. And for warm nights / extra ventilation we’ll fabricate open pattern boards, perhaps with vertical rods that spin so they are difficult to saw. Today we roughed in the door tracks; these are much beefier than what I see commonly. Half inch metal, and the screw heads will disappear under the final finish work.

20131130-235547.jpg

In that photo you can also see the companionway grab-handle detail. I built the frame today for the aft cabin hatch, and as a side project made up some decorative wood inserts to make a ‘similar but different’ look for the aft entryway. All of this was after deciding to build a traditional sliding hatch and boards, rather than buying a big hinged glass hatch. Those run over $500, and would open up right in the path of the tiller arm. The slider should prove safer and more versatile for ventilation and privacy options. And hopefully everyone will enjoy the looks of the woodworking :)

20131201-000324.jpg