Yes, but it’s a DRY heat, dear

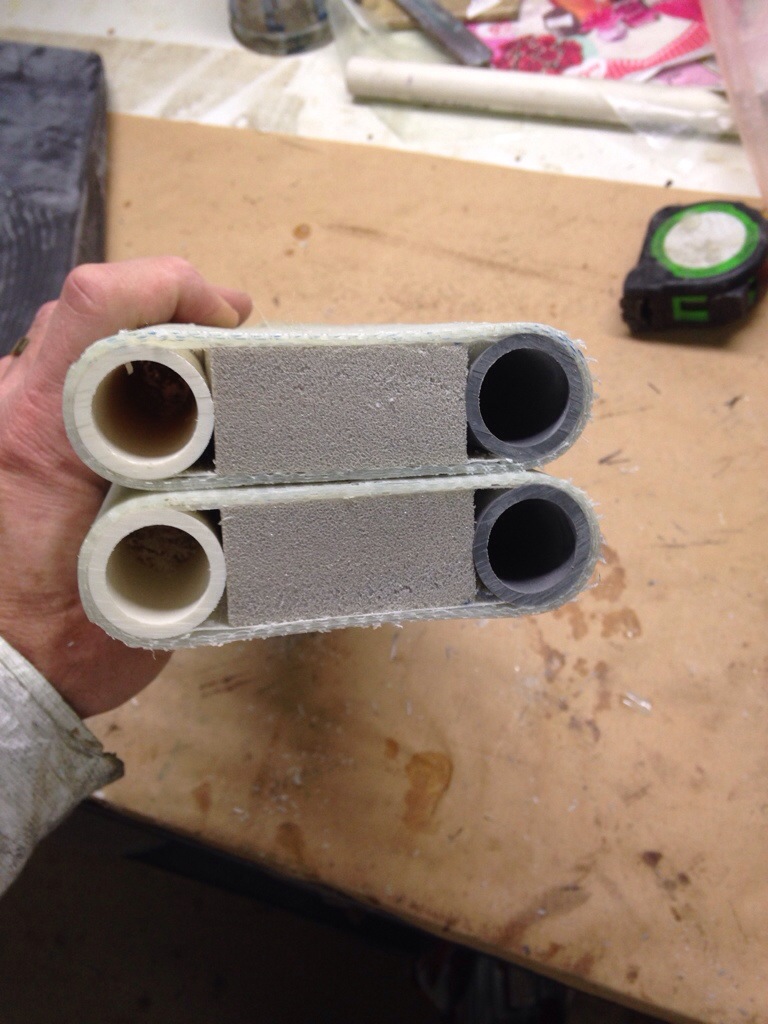
Well, the oven run from the last update got to about 115. So we upped the heat bulb count to 4 x 250 watt plus 5 x 125 for 1600+ watts to heat an 85 cubic foot box. Also added some R13 attic insulation around the box and a small circulation fan inside. With the afternoon sun beating down on the works, we hit and held 160 today, so beam #1 is officially post-cured. Just need three more warm sunny schedule free afternoons.

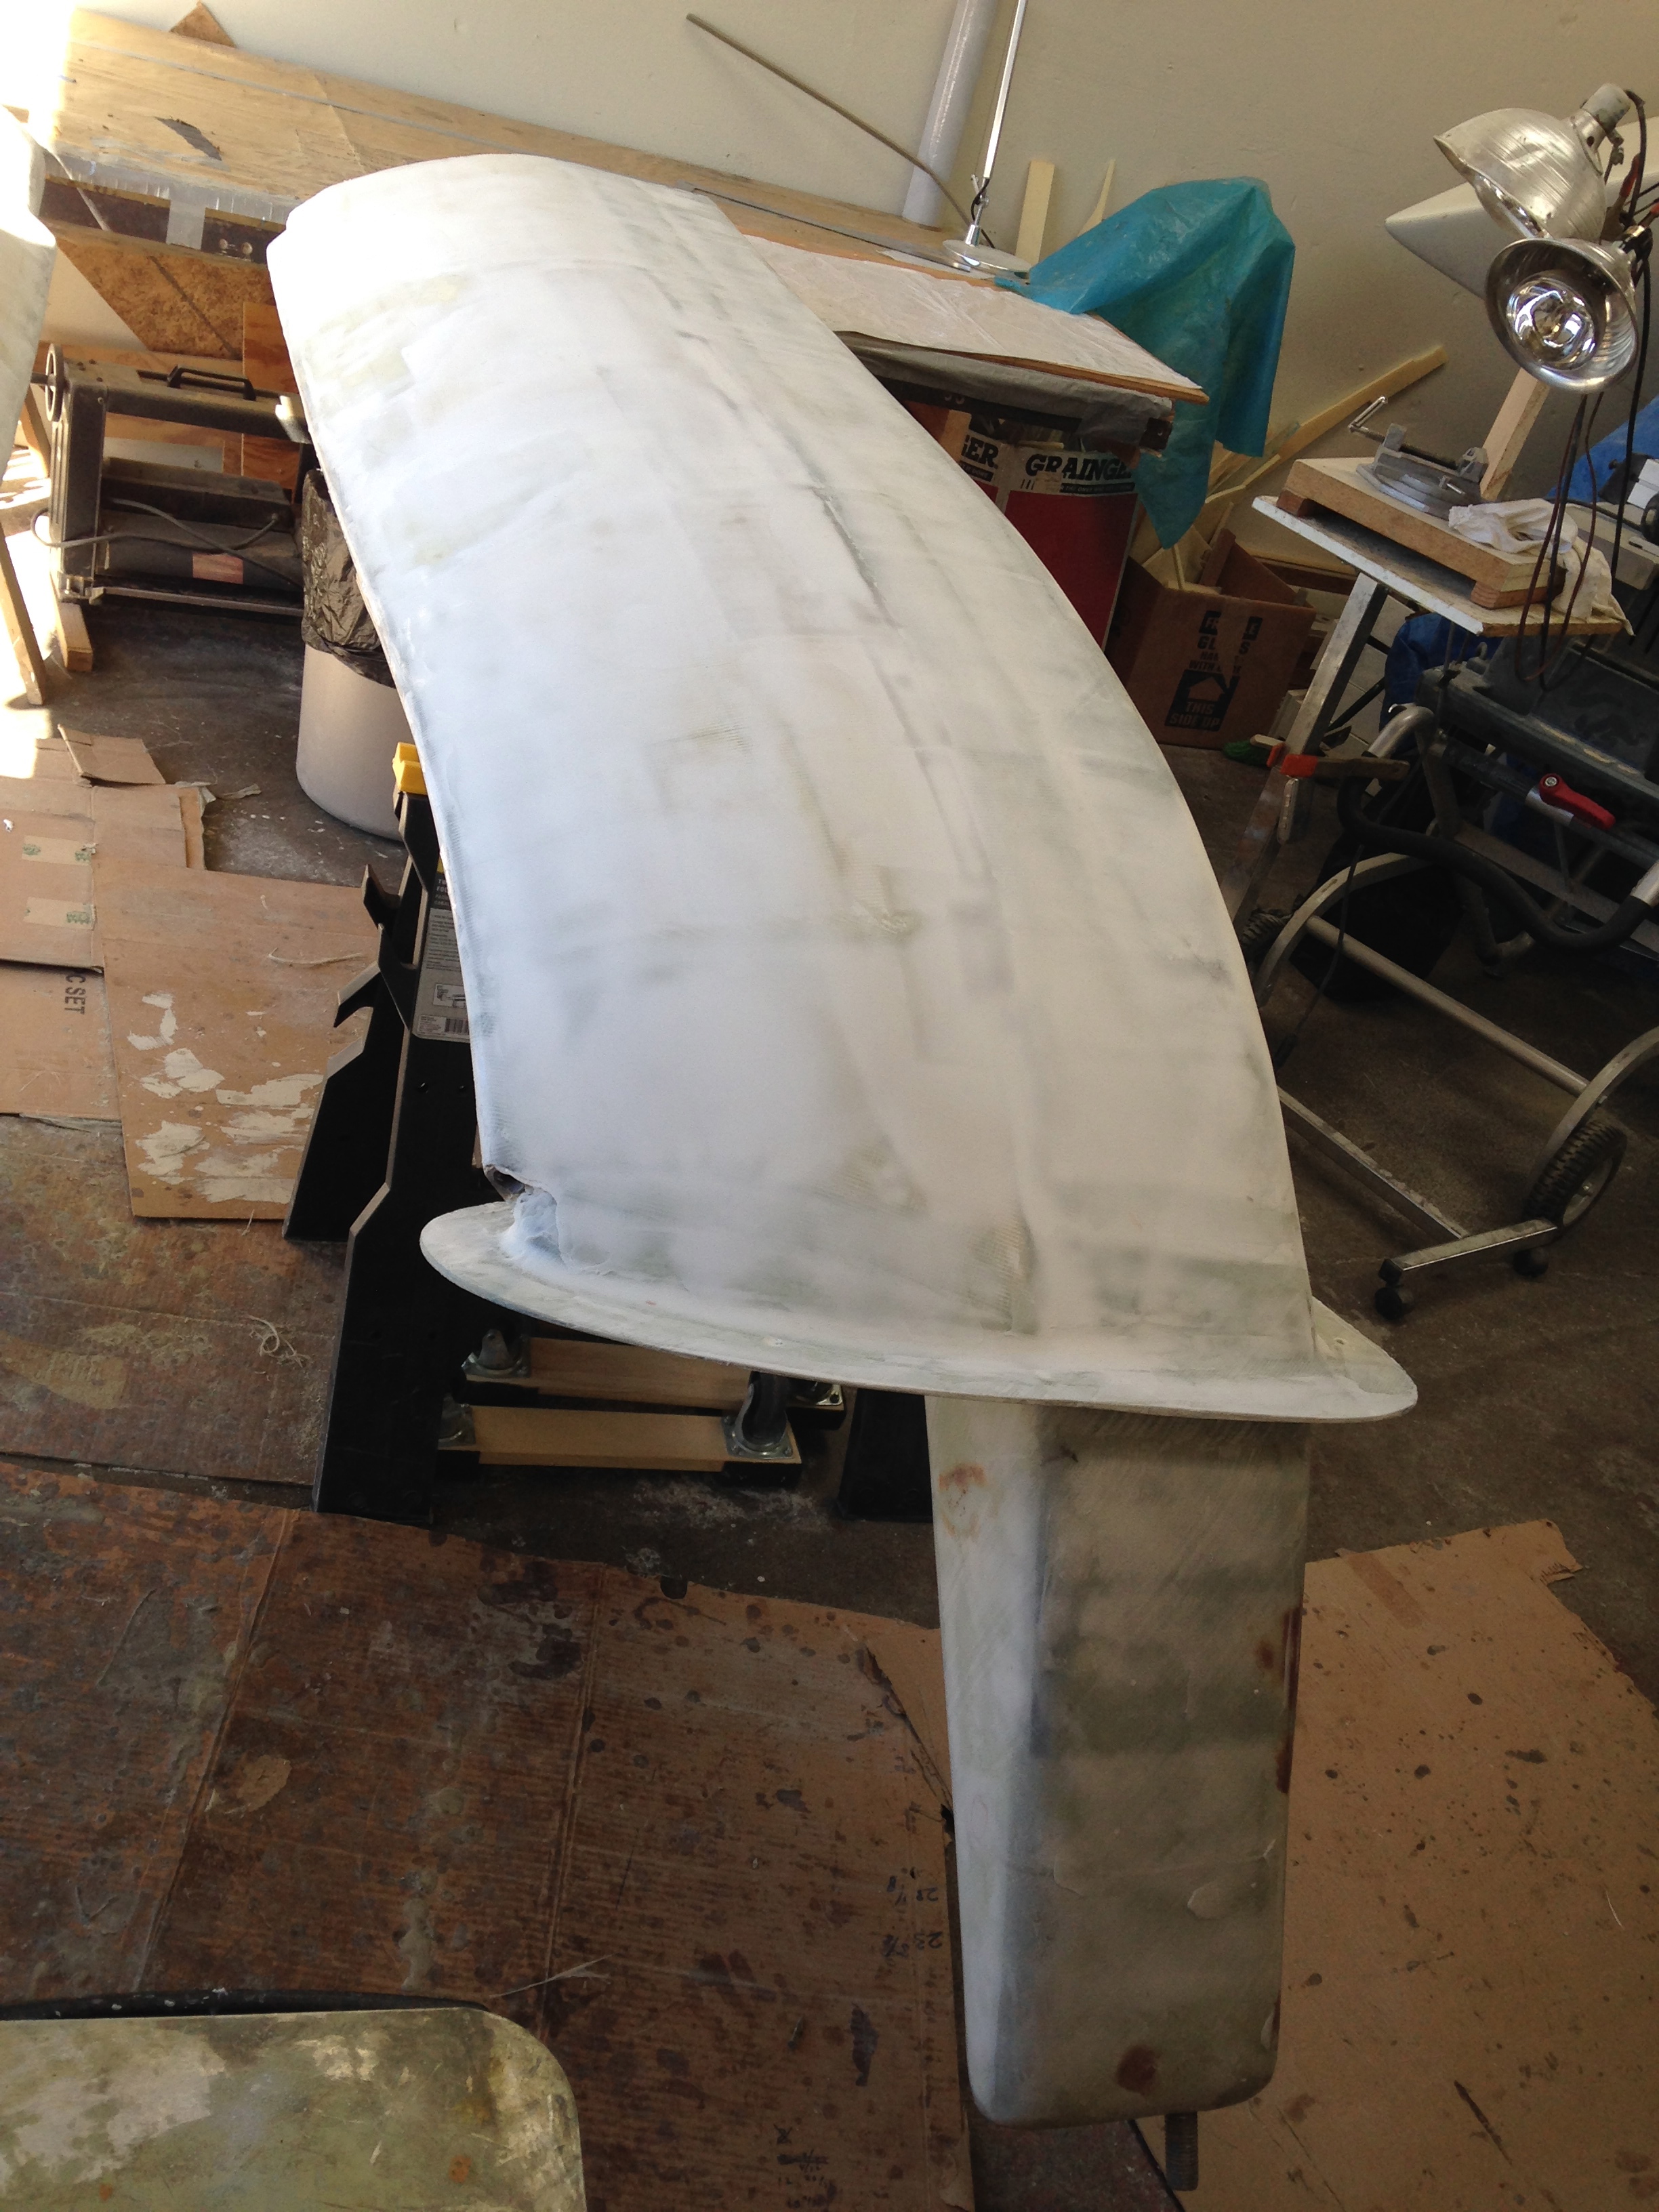
Started fairing the rudder and it looks way better quickly. Photos will come once the fairing is done and we’re in primer. Really need to get this done so the steering components can begin. For those following Fram’s build, with all Henny’s amazing engineering steps, you will see the polar opposite develop here. Simple, crude and hopefully just as effective as the great feeling of steering the F27.

Back to the windshield, the rope pass-thrus came out quite smartly. Here they are being cemented in place yesterday, and were cut off flush this morning.

20140319-003043.jpg
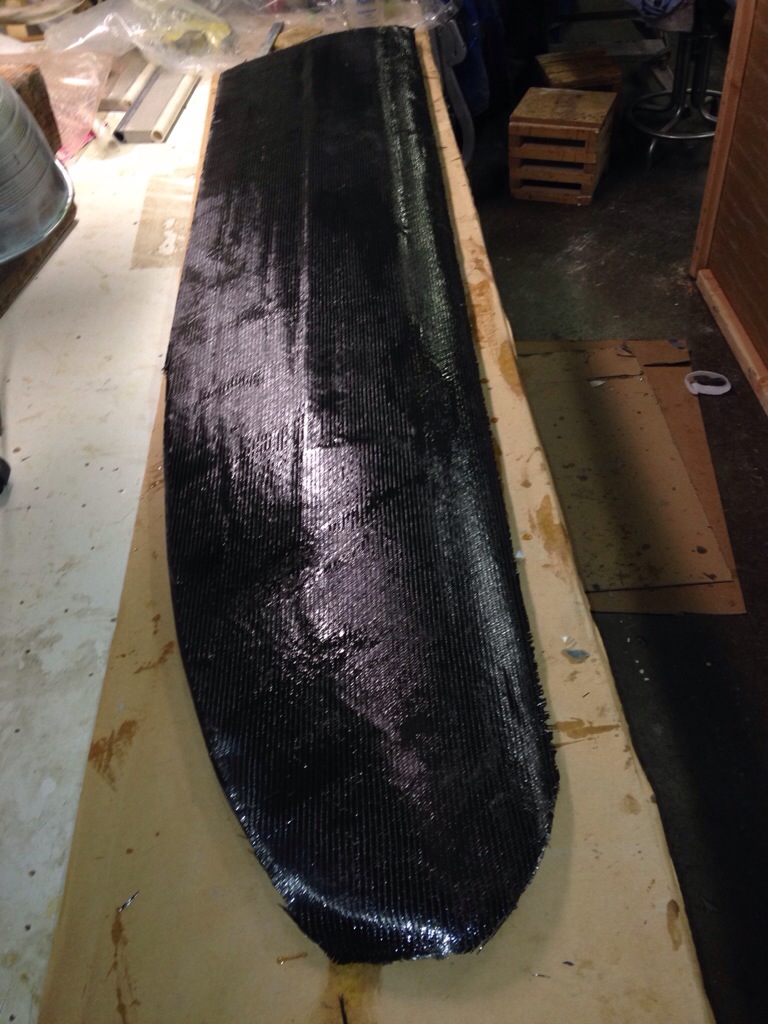
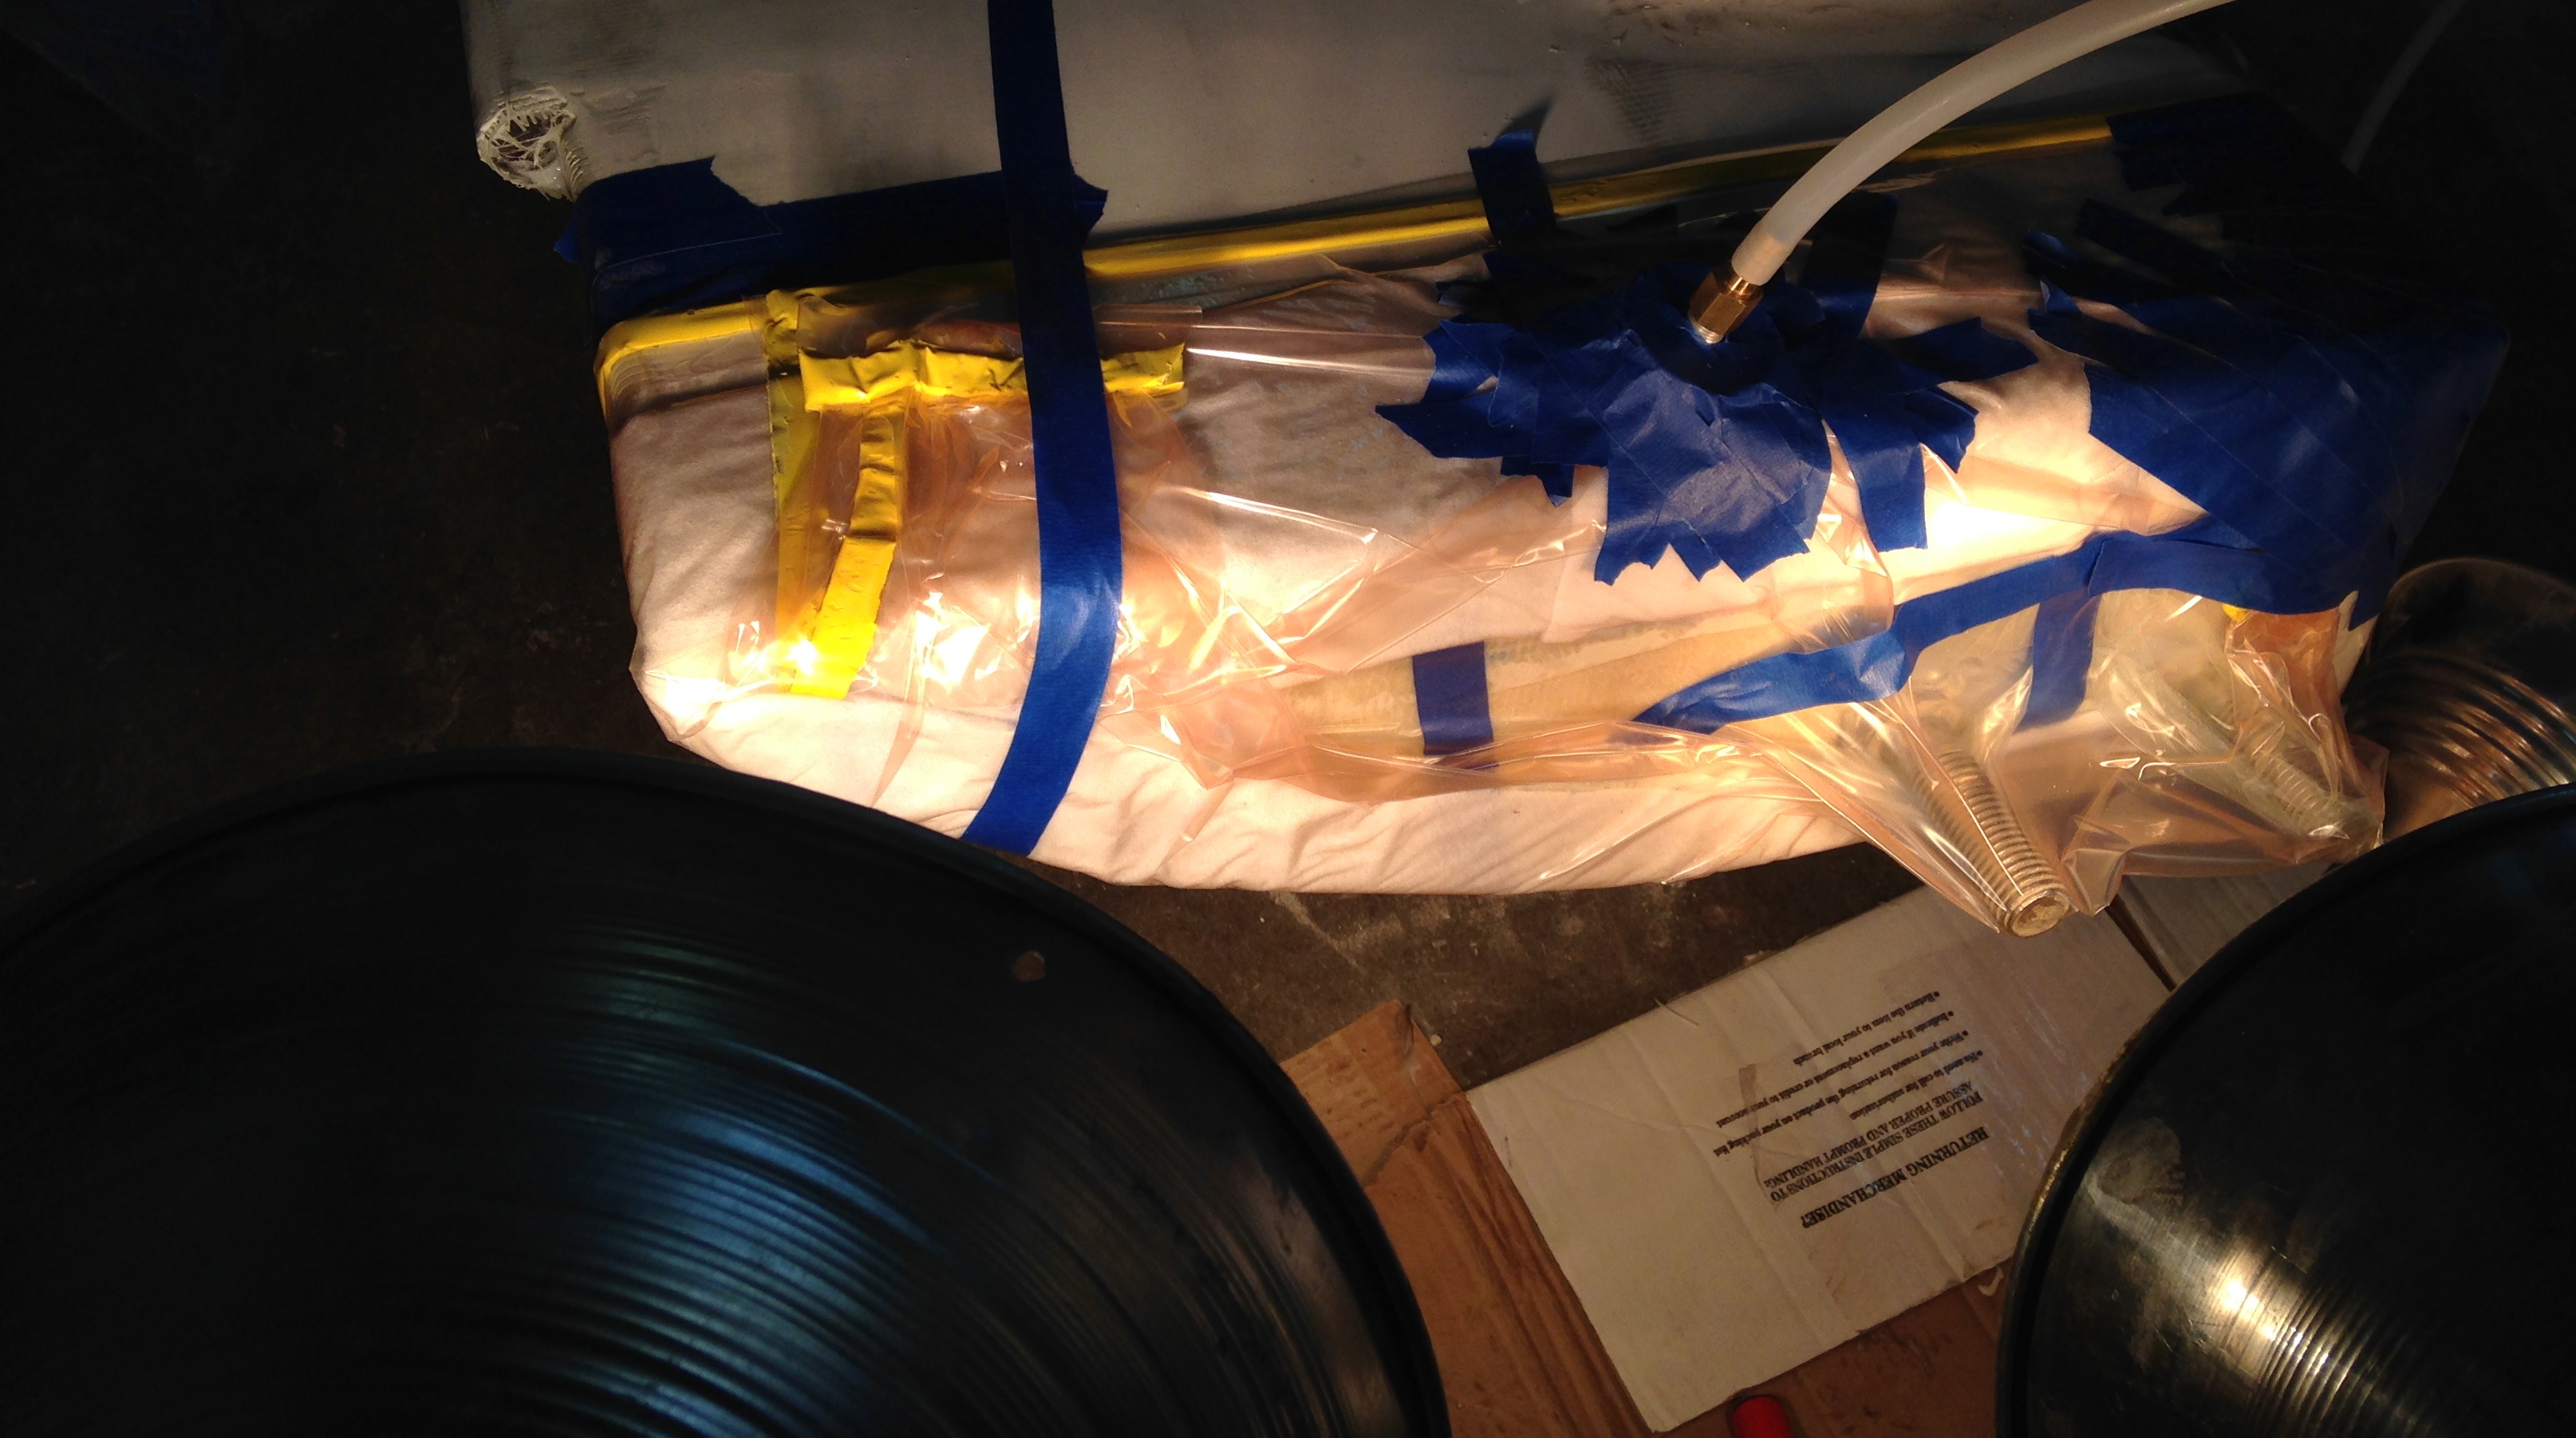
Next the center portion and the port side got 16oz glass and an awkward-shaped vacuum bag.

20140319-003154.jpg
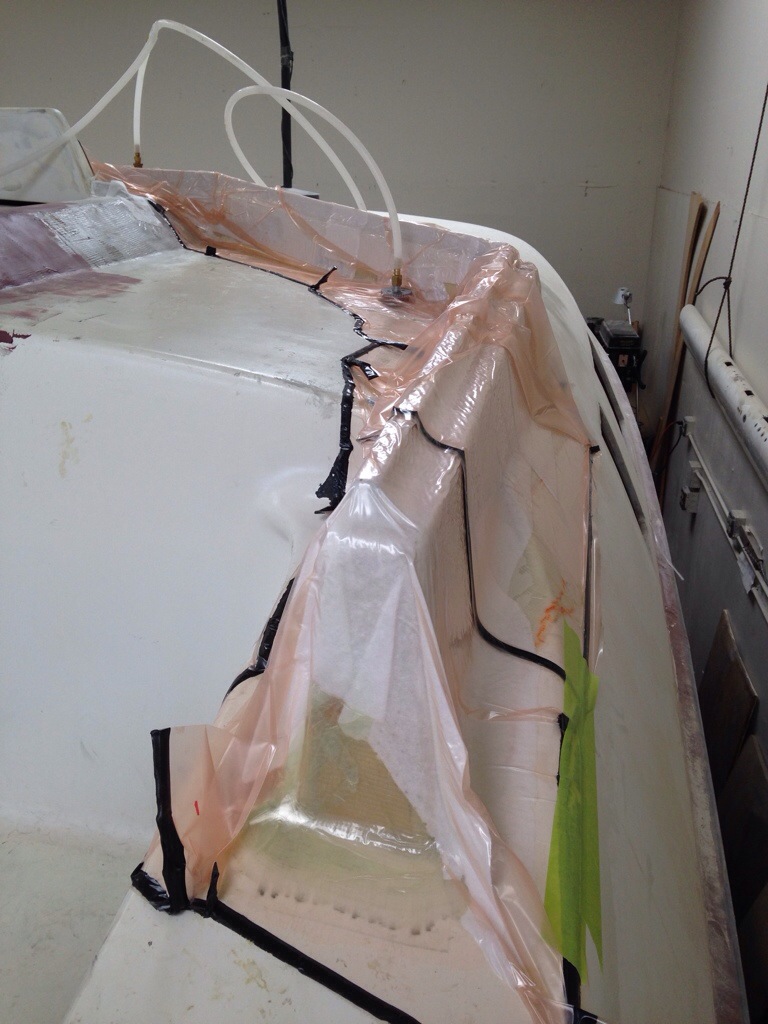
The bagging is getting more proficient, but I still spend too much time chasing leaks probably because of improvising around weird shapes and surfaces once the glass is already wetted out. Two things I wish I had learned in advance: (this note is for new-to-bagging folk)
Attach all the sticky tape in advance to one side of the bag material, doing that work flat on your big table. Things like adding the sticky tape on one end after the glass application totally screwed things up.
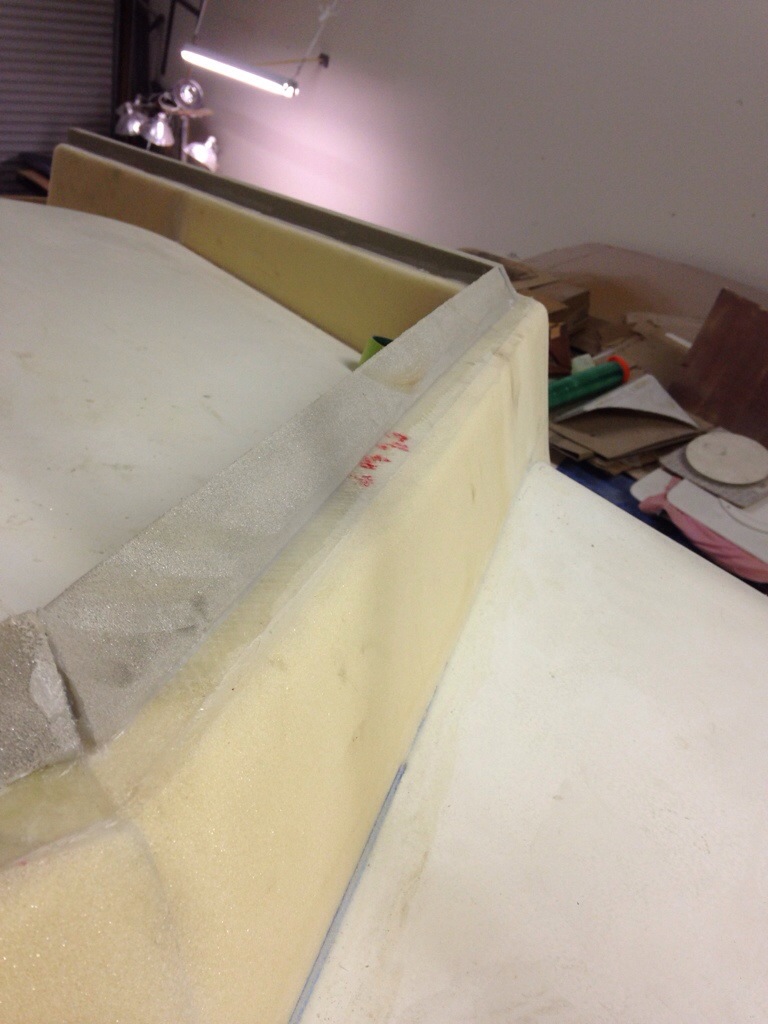
Work a trial run with everything dry and plan out where extra baggy material is need to conform to staggered / stair step shapes. Otherwise it’s really frustrating to have a whole bagging set up but one big corner gets stretched to the point where there is no actual downward pressure on an inside curve or corner. This stuff sounds easy but it seems a real experienced art form to me. Tricky to get it right and I keep learning to make the bags bigger, although my inner tight-wad pushes back on materials (perceived) waste. Let’s see if tomorrow night’s port side windshield frame gets done more smoothly than today’s.

Baked Beams, anyone?

It got warm in Santa Rosa and my thoughts turned to summer BBQ – hot dogs, baked beans, cobs of corn…
But really we need to post-cure the epoxy in the beams and steering parts, so we need a big oven to reach and hold 160 degrees (F) for 2-3 hours per session. Made this from Sheetrock and ripped 2x4s, just big enough to house one forward beam resting on its furniture dolly.

20140313-234540.jpg
Pulled the top on, and it started working right away, but the fan-aided space heater hit a safety kill setting at about 95 degrees. So tomorrow we’ll follow Gordie Nash’s advice and find a cheap baseboard wall heater at Home Depot. And perhaps have to take some license pulling out any safety settings if it has a brain.

The rudder took shape nicely and has now gone thru the carbon lamination steps. Each side got a staggered 14 layers staring from the top down. There’s some extra wraps over the upper edges, and the outer skin of the second side went in the vac bag this evening.

20140313-235056.jpg
The last step will be adding a bit of Kevlar tomorrow to the leading edge, just to provide some impact resistance.

While the rudder was in a bagging step, we free handed an idea for strengthening the slot where halyards will pass thru the windshield back to the winches. Simply take 24″ of PVC pipe and tape it to some foam:

20140313-235441.jpg
After waxing the mold, we made three trips around with wet fiberglass and let dry overnight. Cut it in half the next day and pop out the molds from each 12″ piece (that’s the step in the photo). I need to take a winch to the shop and mock up all the exact positions for these line guides, then we can cut the windshield frame openings to match and glass these tunnels in.

20140313-235721.jpg

And here you can see the decision on how to affix the removable windshield to its base. Bolts will go in horizontally along this grey wedge that has been set at the proper angles desired for each window pane going around the frame.

20140313-235920.jpg
This windshield base is now ready for glassing this weekend. After a bike ride. :)

Changing the sight lines

The windshield base is now complete, and it’s a little scary to be changing the look of the boat this much. We REALLY want a nice protective wind and wave screen, and it seems to make a lot of sense to have this with a removable top. Kind of like a little roadster car, where the winter hard top can be left home in the garage during the sunny weather.

IMG_0699

IMG_0700

But how do you design the side windows for a windshield that stays put and hard top that can be removed? I’d rather not have soft plastic side curtains, so maybe part of the windows will attach to the top?  As Drew quickly figured out, the Hallberg-Rassy boats got me thinking; one with windshield style…

HR43MkIIIpano2

and theirs with the permanent hardtop…

HR48MkIIsailing887RickTomlinson

If anyone has ideas on how to combine these two, let’s hear them!  (maybe split the side windows in to stacked triangles, the lower being part of the windshield, and the upper a part of the hardtop. And a hand-hold running along the joining seam?)

Back in fairing land, the first two beams are getting close. This thing actually looks like the right overall shape now. A skim-coat went on last night, so tomorrow’s sanding should be all about ‘finding final level’.

IMG_0697

With the other two beams down at floor level, I figured it was a good time to add the final two glass layers that tie the fairings to the inner end piece. After having just read Henny’s account of a very frustrating vacuum bag leak chasing on his major hull infusion job, I was feeling happy and smug about our ‘bagging’ success so far. Pride can be a nasty thing, as I was treated to a horrid Saturday evening of leak chasing! This little bag isn’t pretty, but the ridiculous part is all the blue tape… that’s operator error thinking he was hearing leaks along the yellow sticky tape line, and then the vacuum plug joint.

IMG_0701

There were actually two of these bags, set up with a t-fitting over to the pump. The pictured one would not get past -8 mercury inches, and the other one only -4 (-20 to -25 is my preference). After about an hour and a half of cursing and messing with tape, I came to the realization that air was probably being sucked thru the unfaired portion of the glass weave where the wave deflecting fairing joins the main square beam – if I had waited to do this operation until all the weave had been filled in, this would have likely been a 10 minute, ‘just fine’ operation. Argh. And of course after rolling around on the floor all that time, it was time to check the vacuum pump. Big problem there as many ounces of pump oil had blown out the exhaust hole. This new $400 pump has blown some oil on each of its first five runs, but it gets worse each time. Really hoping Fiberglass Supply will come thru with warranty support tomorrow. Time to take a Sunday break and go watch the Super Bowl commercials (and lick wounds over no 49ers).

Don’t want the fire-hosing!

When you see the videos from the Volvo Ocean Race boats bashing through big waves at 25kts, the alarming thing to me is the blasting of water that often hits the exposed driver, not to mention anyone else who happens to be on deck. Not that we expect to be that extreme, but this should be a relatively fast boat and there will be days of choppy water and cold temps. Simply put, we need a good windshield.

This project is a custom job (not in the designer’s plans). I’m making it in removable sections so we keep the trucking height down, and have options for a more open air cockpit here in SF bay. Here’s the first step, laying out three big forward windows via base framing.

20140127-215456.jpg

20140127-215512.jpg

Tomorrow we’ll fill in the big gap from these new frames down to the sloping-away coaming, and start on the forward edge of the frame. Building it right on the boat seemed faster then mocking it all up on the workbench with repeated up and downs.

Meanwhile, the beam bottom sides were finished and Sunday afternoon Griffin helped me get two of them up in position for fairing the tops. Unfortunately it looks like the wave-deflector framing mold had about a quarter inch miss in two of the nine forms. That showed up today as shallow depressions on the front slopes of the finished beams. So we’ll have a few ounces of wasted weight added with some extra foam and another light glass layer over the fill-in areas. And of course chalk up another couple of hours in the re-do column. (Keep the saw exactly on line next time).

20140127-222020.jpg

Follow the leader

All four big crossbeams are back down on the ground, clogging up the workshop with a big push to get them faired and finished (then protective wrapped and stored away in back). The last building step is to form the net lashing rails. Earlier we saw some photos of the PVC pipe being affixed to the starboard hulls/beams. Now the fiberglass is going on – these layers will sit under the final wrap layer that ties the fairing to the beam. See the grey pipe under two layers of glass…

20131222-224543.jpg

I got to visit Andy Miller’s F22 for a progress report. He’s nearly done painting; a fancy two tone job with hot yellow below the gunwale and white on deck. Here is the finished product of the net lashing rails. What’s not seen is a 1/4″ rod slid inside the tube. The slots give access points where you run a small line around the exposed rod and back to the net lacing.

20131222-225000.jpg

Can’t quite see his yellow hull as it was masked off during my visit, but the yellow rudder, tiller, etc. look great.

20131222-225149.jpg

Having a floor full of huge beams and yet another suggestion of using a bandsaw for finish work, it became time for a weekend of evening housekeeping. We moved a big pile of various parts into better storage corners, and finally tackled the problem of no dedicated vacuum bagging space. Repurposing scraps (beam mold box sides, etc) yielded a really nice dedicated bagging table, separate from my big table at the shop front.

20131222-225731.jpg

And around the other side of the boat bow we found a little corner for what’s soon to be a dusty, productive mess of shavings as the new little bandsaw and table sander get set up by the drill press, router and chopsaw. The big Bosch table saw is on wheels and has proven a fantastic purchase – that stays up front to handle large sheets and rips.

20131222-230142.jpg

I expect to get a lot of work done thru the holidays as business travel stops. And A LOT done in early 2014 – more on that development to be reported soon :)

Happy Christmas, everybody. If we can’t be out sailing in warm breezes, at least lets have some fun with families and maybe some afternoons getting the boat(s) ready for spring!

The Leneman Steps

Yes, that sounds like a special passageway in old Europe. But back here in California our boat’s boarding ladder gives it’s credit to good friend Mike Leneman and his lovely Minette catamaran. After a brisk Wednesday night sail out of Marina Del Rey, Mike simply stated, “yea Greg, you’ll be making one of these”.

20131128-000747.jpg

These steps will swing up and tie off to the beam brace when not in use, and the whole unit will quickly unpin for storage in the float when at sea. The bottom step is one inch above the waterline when the steps are set at level. They can raise or lower to suit conditions.

Sailing aboard Minette last year was a real inspiration for this project. Mike built her with the same cold molding strip plank and glass method, making a strong, light boat out of trailer able large hulls, beams and bridge. Her simple systems and big powerful rotating rig scared Jim and I at first, but the speed and sea keeping abilities really grow on you quickly. It’ll be a thrill to join Mike down south next year.

20131128-001155.jpg

Here’s a clearer shot of the rear diagonal brace behind the aft beam. Very sturdy and designed to keep the whole boat square (prevent wracking that can occur in weaker trimaran designs). Thanks again Dad for cutting all the thick metal tangs that I cemented in to this pole. The epoxy goes in 4 inches, stopped by foam plugs at each end. There will be netting placed in this triangle later on.

No shop work yesterday as the decks (and minds) were cleared for Jeanne and Greg to enjoy our 25th wedding anniversary day. Sunset on the Pacific was perfect.

20131128-002504.jpg

Anchors aweigh

Made good use today of a five foot section of carbon fiber mast from a previous salvage. We used a thin slice to mark the hull, then cut in from both sides just inside the front of the anchor locker. The mast section is very strong and will make a nice foundation for anchor rollers on both sides of the bow. It certainly changes the current sleek look of the front of the boat, but keeping the anchor(s) away from the bow stem and fore-sail handling will be a great help. This will also be the attach points for the nets, making the whole front end safer as the nets get wider.

20130526-191519.jpg

20130526-193428.jpg

10 tubes of Home Depot PVC pipe

Well, no posts in April because it was only a day or two in the boat shop due to extensive work travel. And a fun Saturday at the Strictly Sail boat show in Oakland. Drew, Dad and I hit the info booths hard; navigation equipment is tricky as we search powerful auto-tillers and wind instruments with the rotating mast. But good progress was made on the engine-to-prop system, leaning towards Yanmar and a Gori prop now.

Here’s the rear deck with rudder post area now complete, ready to start fairing.

20130503-231610.jpg

Stopped in at Home Depot for 10′ lengths of 3/4″ PVC electrical conduit to form the basis of the nets’ lashing anchor points. Epoxied them to the hulls and beams (used temp screws to hold in place), then a few hours today to fillet them for more bonding surface area. Next they’ll get glassed over with two layers of cloth. Once these tubes are all built and faired in, we’ll use a jig to cut ‘windows’ in the tubes so small rope can be looped over a small rod inserted the length of the conduit pipe.

20130503-232129.jpg

The lashing tubes define the surface area of the starboard main net here…

20130503-232228.jpg

And finally with a weeknight not on the road, I sat in the little engine room for an hour last night finally figuring out locations for the water tanks, fuel tank, fridge compressor, watermaker and furnace. A bit if a puzzle, but things should tuck nicely in to their spots. First up was finalizing the refridge order with the CoolBlue people in Orange County today. Good USA quality, at a decent boat-show discount. Let the systems begin!

Boarding platform

The stern area of the boat is mostly worked out now, with the ‘back deck’ and swim step all tied structurally to the rudder post. The port side will be for climbing aboard, so the lower platform is extended a bit past the hull edge to make a proper foot landing pad. A ladder can be bolted to the vertical panel above that step.
The red color comes from the ‘microballons’ – fine powder that thickens the epoxy and makes it sandable for final smoothing. These red lines in the corners are the ‘fillets’ – curved joints of glue that significantly increase the surface area (thus strength) of the bond. The gentle curve also makes the fiberglass tape layer (still to do in this photo) adhere better.

20130331-161714.jpg

Also worked this weekend on affixing the beam fairings to the fronts of the beams. Cut three access holes in the tops to reach inside and tape the inside surfaces to the beam and float. This photo is the start of bolting flanges. Glass is affixed to the beam but not the deck (plastic tape and wax in between. All of this will look much prettier after the beam comes back off and can be worked down on the floor. Stay tuned…

20130331-162222.jpg